Deploying a Django app to Sevalla
Objectives
By the end of this tutorial, you should be able to:
- Configure a Django app for deployment to the cloud
- Use environmental variables in Django projects
- Switch from SQLite to a PostgreSQL database
- Spin up a PostgreSQL database on Sevalla
- Deploy a web service to Sevalla
- Deploy Celery for task processing to Sevalla
What is Sevalla?
Sevalla is an easy-to-use Platform as a Service (PaaS) that enables you to effortlessly deploy your apps. It offers application hosting, managed SQL and NoSQL databases, static sites, and S3-compatible storage.
The platform stands out for its sleek and intuitive interface, which makes deployment a breeze. Furthermore, it is highly flexible, as it provides three build options: Nixpacks, Buildpacks, and custom Dockerfiles.
By using Sevalla, you'll be able to focus on building your app while outsourcing all the mundane infrastructure work. With a pay-as-you-go pricing model, you'll only be charged for what you use.
At the time of writing, Sevalla offers $20 free credits to all newly registered users.
Introduction
In this tutorial, we'll deploy a production-ready Django app to Sevalla. The tutorial is divided into two parts: the pre-deployment configuration and the deployment section.
To make it easier to follow along, I've prepared a simple Django and Celery project that you can use as a starting point. All the project does is simulate long-running tasks. Alternatively, you can follow along with your own Django project.
First, clone the base branch of the GitHub repository:
$ git clone [email protected]:duplxey/sevalla-django-deploy.git -b base --single-branch
$ cd sevalla-django-deploy
Create a virtual environment and install the requirements:
$ python3 -m venv venv && source venv/bin/activate
(venv) $ pip install -r requirements.txt
Migrate the database:
(venv) $ python manage.py migrateStart the development server:
(venv) $ python manage.py runserverYour web app should now be accessible at http://localhost:8000.
Since the project uses Celery — a distributed task queue, you’ll need to spin up a Redis instance and start a Celery worker to take care of the long-running tasks.
First, start a Redis container:
(venv) $ docker run -d --name redis -p 6379:6379 redisAlternatively, you can use a locally installed Redis instance.
Then, launch a Celery worker:
(venv) $ celery -A core worker --loglevel=INFO --concurrency=1Voilà! The app should now be fully functional. Navigate to http://localhost:8000 and attempt to initiate a few tasks. If you have completed everything correctly, the tasks should appear in the table along with their corresponding statuses.
Want to learn how to build this project from scratch? Check out the Handling long running tasks in Django apps article.
Configure project
In this section, we'll configure the Django project for deployment to Sevalla. We'll take care of the requirements.txt, environmental variables, swap SQLite for PostgreSQL, and install a production-grade WSGI server.
requirements.txt
If you're working with your own Django project, you might not have a requirements.txt file. If that's the case, go ahead and create it by running the following command:
(venv) $ pip freeze > requirements.txtThis command saves the names and versions of all the packages installed in your virtual environment to a text file. Sevalla will use this file to determine which packages need to be installed for the web app to function correctly.
Environmental variables
We shouldn't store secrets in source code, so let's use environment variables. The easiest way to do this is by leveraging a third-party package called python-dotenv.
The sole purpose of the package is to read key-value pairs from an .env file and set them as environmental variables.
Start by adding it to the bottom of requirements.txt:
python-dotenv==1.2.1Don't forget to also install it locally via pip install.
Next, initialize the package at the top of settings.py:
# core/settings.py

from dotenv import load_dotenv
load_dotenv()
Lastly, instead of hard-coding SECRET_KEY, DEBUG, and ALLOWED_HOSTS, load them from env:
# core/settings.py

# SECURITY WARNING: keep the secret key used in production secret!
SECRET_KEY = os.environ.get("SECRET_KEY")

# SECURITY WARNING: don't run with debug turned on in production!
DEBUG = os.getenv("DEBUG", "0").lower() in ["true", "t", "1"]

ALLOWED_HOSTS = os.getenv("ALLOWED_HOSTS").split(" ")
Finally, create an .env file in the project root:
// .env

SECRET_KEY=complexsecret123
DEBUG=True
ALLOWED_HOSTS=*
The environmental variables will now be loaded from this file.
Database
By default, Django is configured to use an SQLite database. While SQLite works in development, it isn't the most appropriate for production. Let's swap it for PostgreSQL.
PostgreSQL is a powerful, production-ready SQL database, known for its robustness and extensibility. Best of all, it integrates perfectly with Django.
First, add the PostgreSQL database adapter to requirements.txt:
psycopg2-binary==2.9.10Don't forget to also install it locally via pip install.
Instead of setting each database parameter separately (such as host, port, or database name), we’ll use a single database URL, following the 12factor standard. A database URL combines all the connection details into one string, and Sevalla will automatically pass it to our web app.
Database URL has the following structure:
postgres://USER:PASSWORD@HOST:PORT/NAMETo parse the database URL, add dj-database-url to requirements.txt and install it locally with pip install:
dj-database-url==3.0.1Finally, modify the DATABASES setting in settings.py like so:
# core/settings.py

DATABASES = {
    "default": dj_database_url.config(
        default=os.getenv("DB_URL", "sqlite:///db.sqlite3"),
        conn_max_age=600,
        conn_health_checks=True,
    ),
}
Note that an import is required at the top of the file:
import dj_database_urlThat's it. Your Django project can now connect to a PostgreSQL database via DB URL.
WSGI Server
Moving along, let's install Gunicorn, a production-grade WSGI server that will be used in production instead of Django's development server.
Add it to the requirements.txt file:
gunicorn==23.0.0If you wish, you can also install it locally via pip install.
If you're on Linux or macOS, you can test the web server by running:
(venv) $ gunicorn core.wsgiYour web app should be accessible at http://localhost:8000.
Version control setup
Before moving to the deployment section of the article, you'll have to push your code to a remote version control system (VCS). Sevalla supports either GitHub, Bitbucket, or GitLab.
First, navigate to the VCS of your choice and create a repository. Take note of the remote URL. If you go with GitHub, it'll look something like this:
[email protected]:<your_username>/<your_repository_name>.gitNext, reinitialize the Git repository on your local machine:
$ rm -rf .git && git initThen add all files to the VCS and commit them:
$ git add .
$ git commit -m "project init"
Finally, add the remote and push the commit:
$ git remote add origin <your_repo_link>
$ git push origin main
Ensure you pushed the code successfully by navigating to the repository in your browser.
Deploy
In this section, we'll deploy the Django project to Sevalla. We'll spin up a PostgreSQL database, create a Django web service, setup environmental variables, spin up a Redis instance, start a Celery process, and lastly connect everything.
The following steps will require a Sevalla account. If you don't have one yet, you can sign up for free.
PostgreSQL
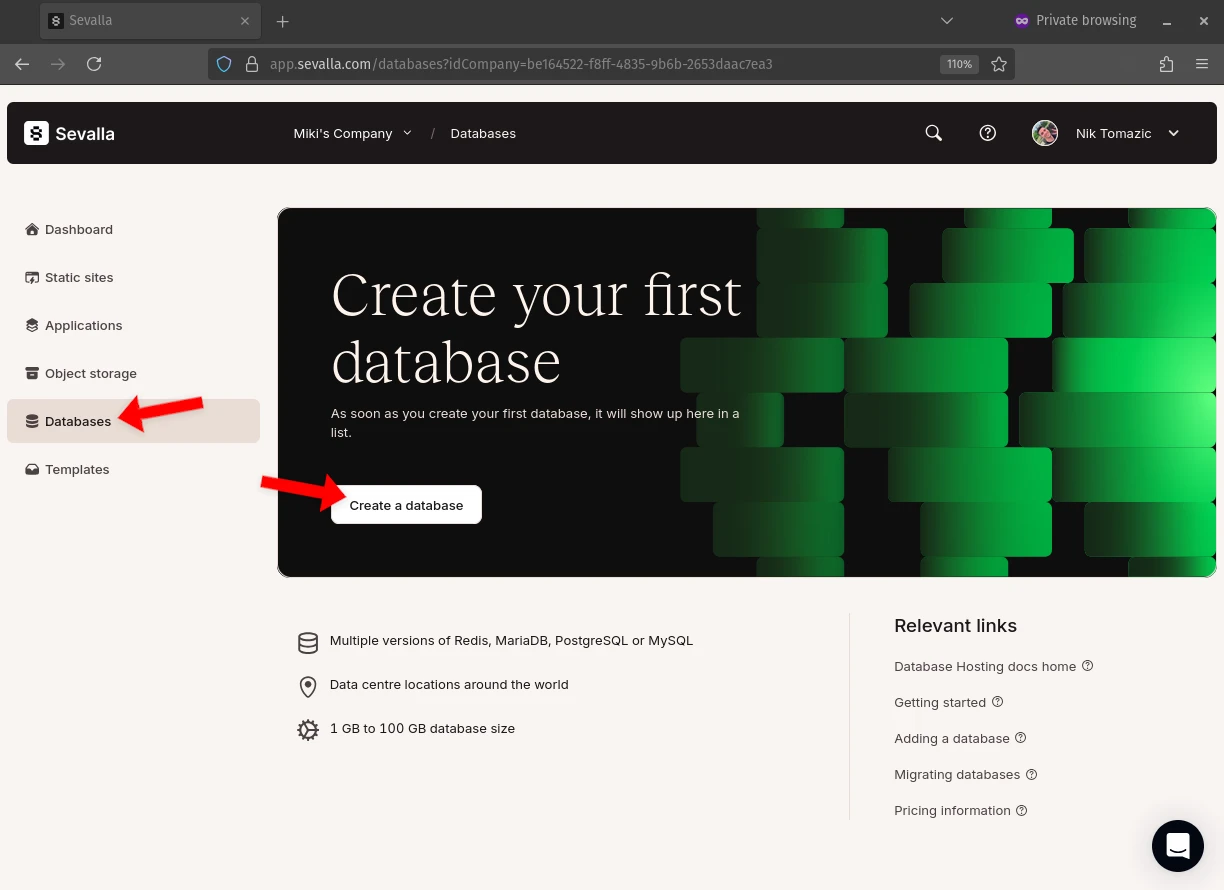
First, navigate to your Sevalla dashboard, select Databases on the sidebar, and click Create a database.
Create a database with the following details:
- Engine: PostgreSQL
- PostgreSQL version: 17
- Database name: Leave as it is
- Database user: Leave as it is
- Database password: Leave as it is
- Name: sevalla-django-postgres
- Location: Location closest to you
- Resources: Plan that suits your needs
Sevalla will take a moment or two to provision the database. Once the database is ready, its status will change to Ready.
You'll notice that the database credentials are split into two sections: internal connection and external connection. By default, external connections are disabled, meaning that you can only connect to the database from services hosted on Sevalla.
If you wish to connect to the database from your machine, toggle external connection.
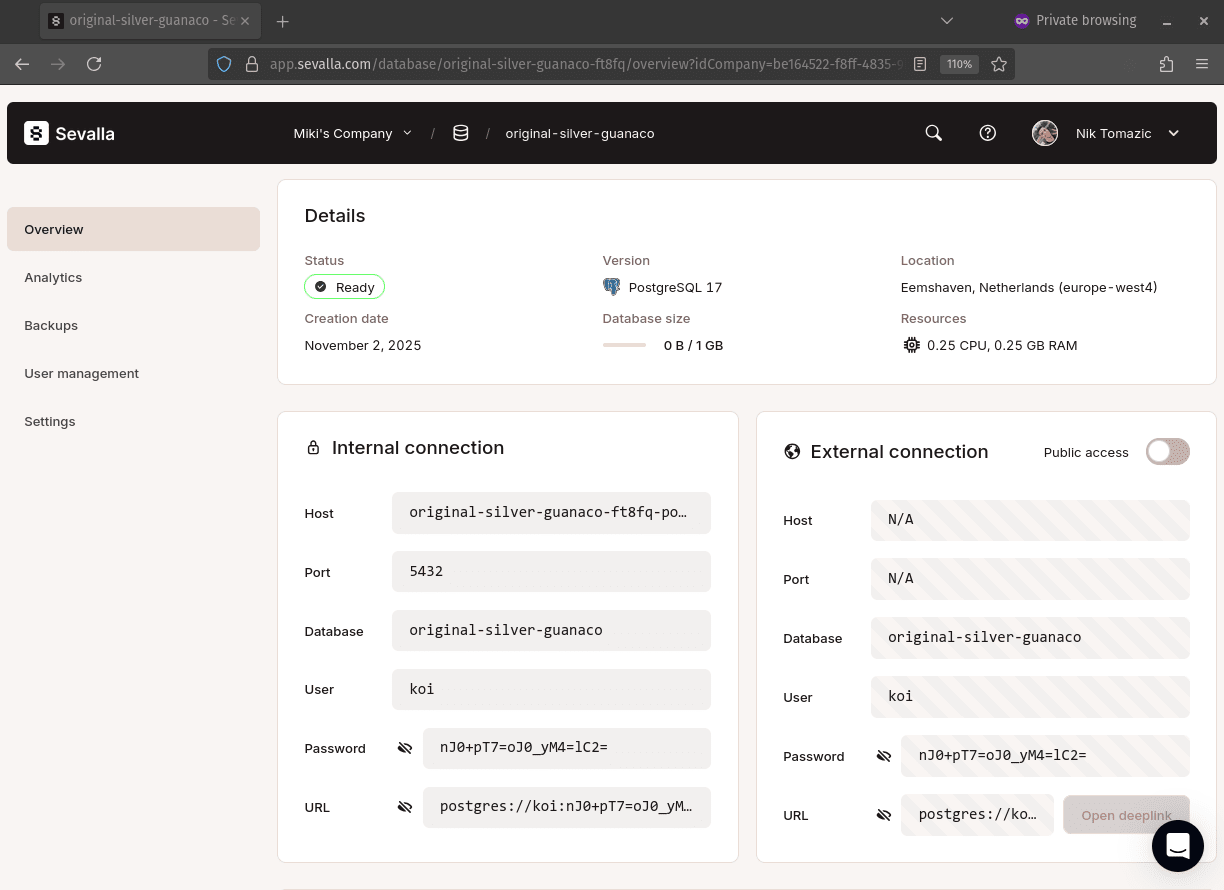
There's no need to take note of the DB parameters as they'll be automatically passed to the web service once we connect it to the database.
Web service
Moving along, let's deploy our Django app. Select Applications on the sidebar, and create an app with the following details:
- App source: Git repository
- Repository visibility: Your repository visibility
- Version control system: Your VCS
- Repository: Select your repository
- Branch: Select your repository branch
- Automatic deployment on commit: Check
- Name: sevalla-django
- Location: Location closest to you
- Resources: Plan that suits your needs
Once the application is created, Sevalla will redirect you to your application dashboard.
PostgreSQL connection
Let's connect our Django web service and the PostgreSQL instance.
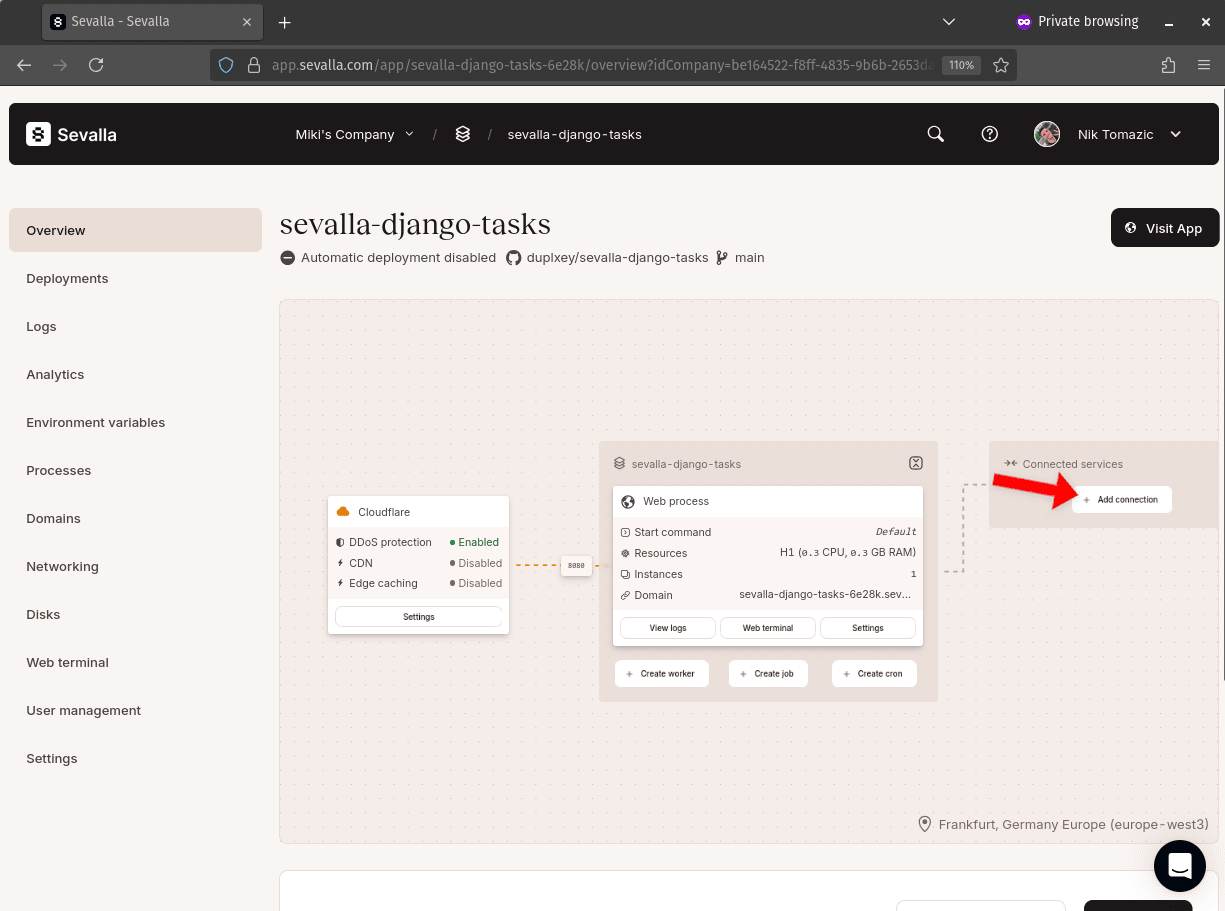
In the diagram on the Overview page, you'll notice an Add connection button in the Connected services section. Click it.
Select your PostgreSQL instance, ensuring that Add environment variables to application is checked. Finally, click Add connection.
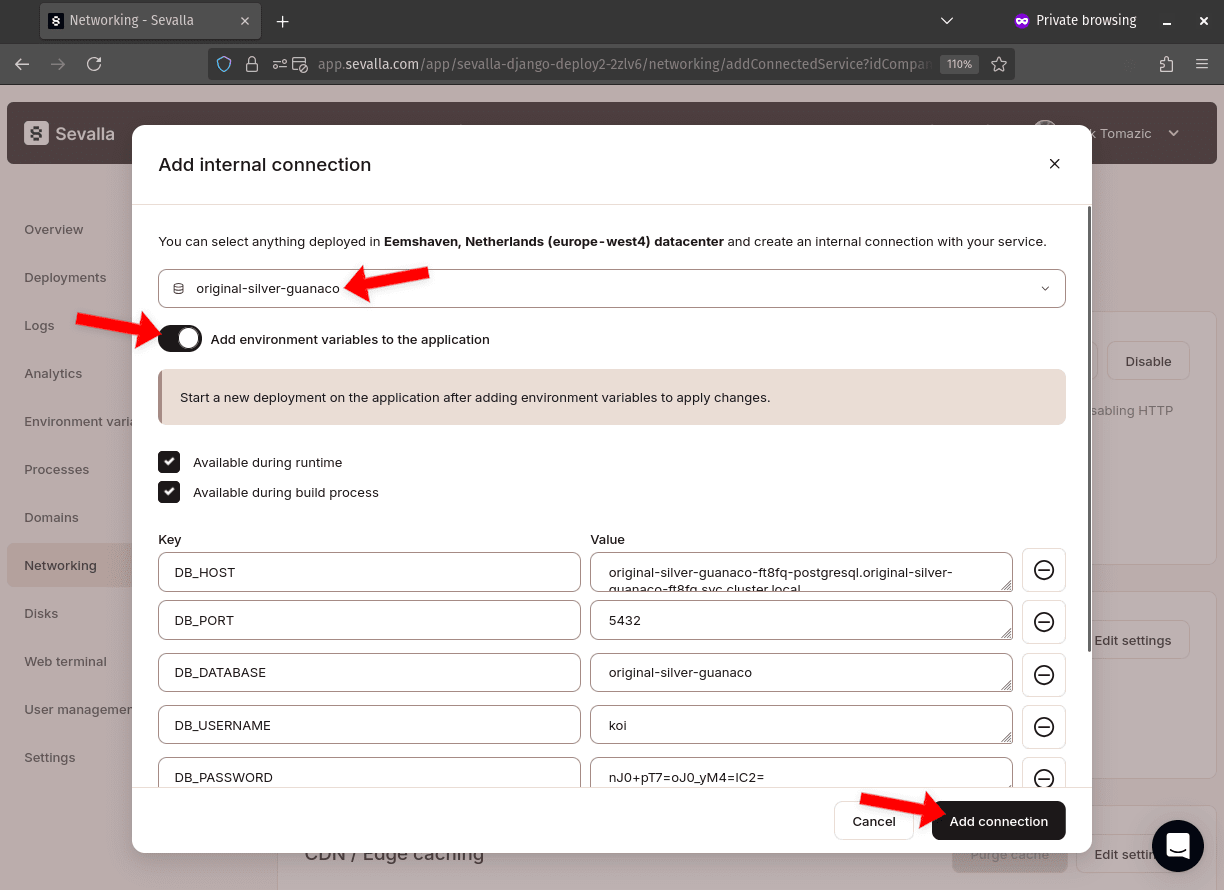
By adding the connection, Sevalla will pass the database parameters and the database URL as environmental variables to the Django web service.
Environmental variables
Next, select Environmental variables on the sidebar, and add the following three:
+----------------------+-------------------------------------------------------------+
| Key                  | Value                                                       |
+----------------------+-------------------------------------------------------------+
| SECRET_KEY           | complexsecret123                                            |
+----------------------+-------------------------------------------------------------+
| DEBUG                | 1                                                           |
+----------------------+-------------------------------------------------------------+
| ALLOWED_HOSTS        | *                                                           |
+----------------------+-------------------------------------------------------------+
Ensure they're available during both runtime and the build process.
At this point, our Django web service is ready for deployment. Nevertheless, let's take care of Redis (message broker) and Celery, and then deploy everything as the "whole package".
Redis
Once again, select Databases on the sidebar, and create a database like so:
- Engine: Redis
- Redis version: 8.x
- Database name: Leave as it is
- Database password: Leave as it is
- Name: sevalla-django-redis
- Location: Location closest to you
- Resources: Plan that suits your needs
Then go back to your Django web service and add the Redis connection. Again, ensure that the environmental variables are added to the application.
Celery worker process
Finally, let's create an additional process for Celery.
Navigate back to your Django web service, select Processes on the sidebar, then Create process, and finally Background process.
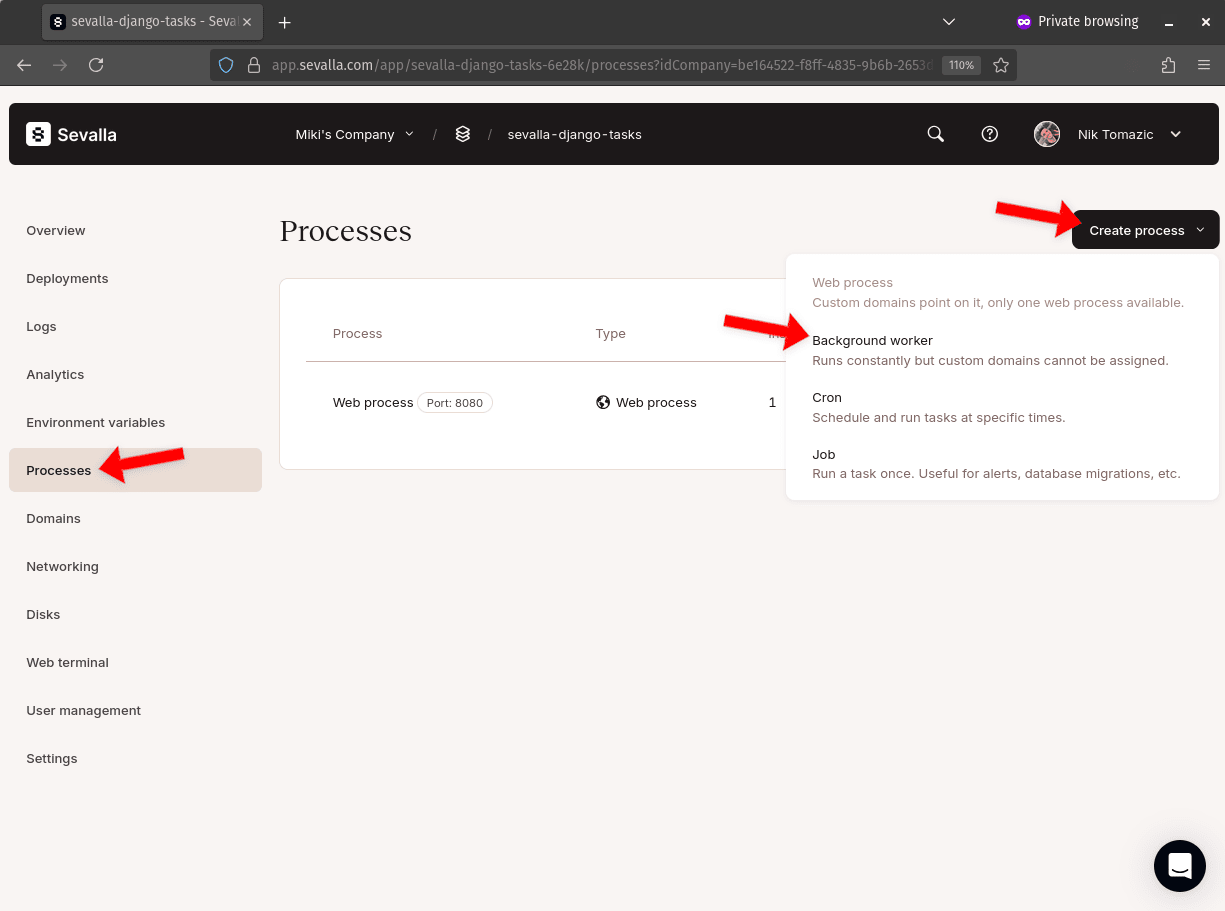
Create a background process with the following details:
- Name: sevalla-django-tasks-celery
- Custom start command:
celery -A core worker --loglevel=INFO --concurrency=1 - Horizontal autoscaling: Off
- Instance count: 1
- Instance size: Plan that suits your needs
Trigger deploy
Lastly, we must manually trigger the deployment by navigating to the Deployments on the sidebar and then clicking Deploy now.
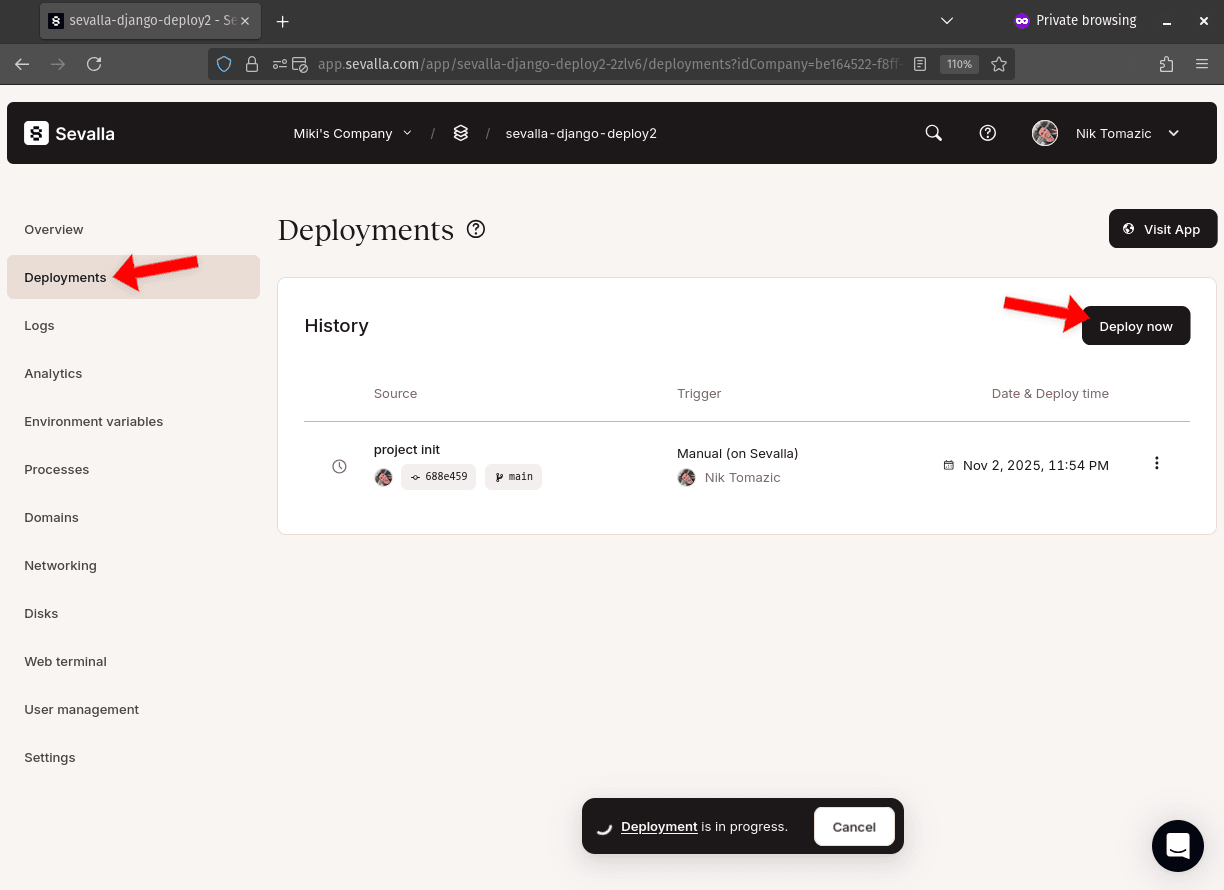
Sevalla will take a few minutes to build and deploy the app. Once the deployment is ready, click on Visit App at the top right of the screen to open the web app in your browser.
Conclusion
In this tutorial, you've learned how to configure and deploy a Django app to Sevalla with PostgreSQL, Redis, and Celery. You now know how to manage environmental variables, databases, and Sevalla service connections.
To make the deployment production-ready, ensure to:
- Disable
DEBUGmode - Properly handle your static and media files
- Set up proper deployment pipelines (
dev&prod)
The final source code is available on GitHub.