Handling long running tasks in Django apps
Objectives
By the end of this tutorial, you should be able to:
- Explain the importance of task queues
- Pick the most appropriate task queue for your project
- Install and configure Celery (a distributed task queue)
- Define and trigger Celery tasks in Django
- Store task results using django-celery-results
Introduction
Most production Django projects include heavy or long-running tasks, such as bulk email sending, importing or exporting large datasets, and generating reports. If these tasks are run directly within the main request-response cycle, they can significantly degrade your app's performance.
This happens because Django has to essentially wait for each task to complete before returning a response. And the performance only worsens as more people start using your app.
To keep your app as performant and responsive as possible, you should offload these tasks to processes independent of the request-response cycle. One way of doing this is by leveraging a task queue.
Task queue
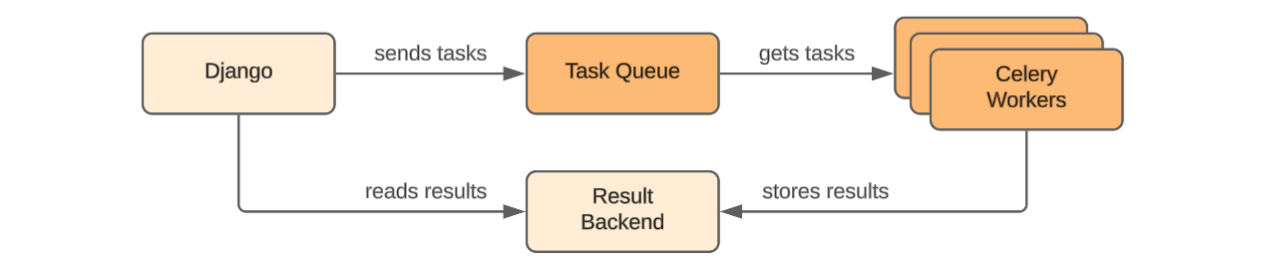
A task queue is a system that allows you to offload tasks for asynchronous processing. Tasks are submitted to the queue from the main process (in our case, Django) and then picked up by workers, which execute them and store the results in a task result backend.
The entire process is orchestrated by a message broker, e.g., Redis, RabbitMQ, or SQS. Some task queues are even capable of using a SQL-based database as a message broker.
When it comes to Django (and Python in general), there are several task queues you can choose from. Let's look at the most popular ones.
Celery
Celery is a reliable and production-ready distributed task queue. It's feature-rich, supports scheduling, retries, monitoring, and is highly extensible. It is the most popular task queue; however, it can be overkill for smaller projects, as it requires an external message broker.
DjangoQ
DjangoQ is another task queue, which integrates tightly with Django and works best for smaller apps. It can use your Django database as a broker, which simplifies the setup but limits work distribution and scalability.
Huey
Huey is a lightweight task queue that’s simple to set up and great for small to medium projects. It supports Redis and file-based storage, but lacks some of Celery’s advanced features like task chaining and built-in result backends.
Django-RQ
Django-RQ focuses on simplicity and reliability. It uses Redis directly with minimal configuration and is easy to monitor via its built-in dashboard. The trade-off is fewer features compared to Celery, such as limited scheduling and retry options.
Django tasks framework
The next major release of Django, 6.0, will come with a built-in tasks framework. That could potentially eliminate the need to use 3rd-party task queues for simpler projects.
Throughout the tutorial, we'll be using Celery, as it is the most popular and flexible option.
Project setup
To make the tutorial easier to follow, I've prepared a web app that simulates long-running tasks. It comes with three endpoints: a dashboard for managing the tasks, an endpoint for initiating a short task, and another endpoint for initiating a long task.
I recommend that you follow along with the sample project, but if you prefer, you can also work on your own project that utilises long-running tasks.
First, clone the base branch of the GitHub repository:
$ git clone [email protected]:duplxey/sevalla-django-tasks.git -b base --single-branch
$ cd sevalla-django-tasks
Create a virtual environment and install the requirements:
$ python3 -m venv venv && source venv/bin/activate
$ pip install -r requirements.txt
Migrate the database:
$ python manage.py migrateLastly, start the development server:
$ python manage.py runserverAs mentioned above, the web app has three endpoints:
/– a dashboard, which will later be used for managing tasks/short-task/– an endpoint for starting a short task (5 seconds)/long-task/– an endpoint for starting a long task (10 seconds)
As of now, if you navigate to the /short-task/ or /long-task/ endpoint, you'll notice that your browser freezes for a few seconds before returning a response. That happens because time.sleep() is used in those two views to simulate a long-running task.
The sleep method essentially blocks the main thread, so Django has to wait for it to finish before sending a response.
# tasks/views.py

import time


def short_task_view(request):
    # Simulate a short running task
    time.sleep(5)

    return JsonResponse({
        "message": "Short task completed successfully.",
    })
By the end of the tutorial, you'll know how to offload these types of tasks to a task queue and ensure immediate responses.
Install Redis
Celery, like any other task queue, requires a message transport to send and receive messages. In other words, we need to ensure a communication channel between our Django app and the Celery workers.
Celery supports multiple brokers. We'll use Redis, as it is the most commonly used one.
The easiest way to spin up a Redis instance is via Docker. To create a Redis container exposed at port 6379, run the following command:
$ docker run -d --name redis -p 6379:6379 redisAlternatively, you can download and install Redis locally on your machine.
Next, add the Redis Python client to your Django project:
$ pip install redis==6.4.0Don't forget to add the package to
requirements.txt.
Install Celery
To install Celery, run the following command:
$ pip install celery==5.5.3Ensure to add the package to
requirements.txt.
Then create a celery.py file in your main Django app with the following contents:
# core/celery.py

import os

from celery import Celery

os.environ.setdefault("DJANGO_SETTINGS_MODULE", "core.settings")

app = Celery("core")
app.config_from_object("django.conf:settings", namespace="CELERY")
app.autodiscover_tasks()
In this code, we first set an environmental variable that tells Celery where to find the Django settings module. After that, we create a new Celery instance called app.
To configure Celery, we use the config_from_object() method, passing in the Django settings. To make a clear separation between Django and Celery settings, we set the namespace to CELERY, which means that all Celery settings need to be prefixed with CELERY_.
For example, to configure:
- Celery's
timezone, we'd change theCELERY_TIMEZONEsetting insettings.py. - Similarily,
cache_backend, would be configured usingCELERY_CACHE_BACKENDinsettings.py.
All Celery settings can be found in the official docs.
Lastly, we called autodiscover_tasks() to automatically discover and register all the tasks that we'll define later.
To ensure Celery loads when Django starts, import it in the package initializer like so:
# core/__init__.py

from .celery import app as celery_app

__all__ = ("celery_app",)
Finally, set the CELERY_BROKER_URL setting:
# core/settings.py

# Celery
# https://docs.celeryq.dev/en/latest/userguide/configuration.html

CELERY_BROKER_URL = os.environ.get("REDIS_URL", "redis://localhost:6379/0")
This setting tells Celery at what URL the message broker is located. In our case, that is Redis on localhost, port 6379.
Define tasks
Defining Celery tasks is easy. All you have to do is create a method and annotate it using the @shared_task decorator. This decorator enables you to define Celery tasks without needing to import the Celery instance, making your code more reusable.
Create a tasks.py file and define two tasks in it like so:
# tasks/tasks.py

import time

from celery import shared_task


@shared_task
def short_task():
    # Simulate a short running task
    time.sleep(5)

    return "Short task completed successfully."


@shared_task
def long_task():
    # Simulate a long-running task
    time.sleep(10)

    return "Long task completed successfully."
The logic of the two tasks is analogous to the logic we have in our views. The only difference is that instead of returning a JsonResponse, we're now returning a string response. That is a so-called task result, which will get stored in the Celery result backend.
Trigger tasks
Moving along, change the short_task_view() and long_task_view() like so:
# tasks/views.py

def short_task_view(request):
    task = short_task.delay()

    return JsonResponse(
        {
            "message": "Short task has been started.",
            "task_id": task.id,
        }
    )


def long_task_view(request):
    task = long_task.delay()

    return JsonResponse(
        {
            "message": "Long task has been started.",
            "task_id": task.id,
        }
    )
Don't forget about the import at the top of the file:
from .tasks import short_task, long_taskInstead of performing the tasks directly in the views, we now invoke the Celery tasks using the delay() method. After the task is sent to the broker, we instantly return a JSON response that contains the task ID and a message.
If our task had arguments, e.g.,
def dynamic_task(duration: int, message: str), we'd also pass the arguments to thedelay()method like so:delay(5, "Sevalla is cool!").
Great, we've successfully installed Celery, defined the tasks, and invoked them from our views. In the next section, we'll test if everything works correctly.
Start Celery worker
Before we can run any tasks, we need to start a Celery worker. The worker runs as a separate process and handles tasks in the background. Once a task is added to the queue, the worker picks it up, executes it outside of the main Django process, and returns the result when it’s done.
Open a new terminal window and start a Celery worker like so:
$ celery -A core worker --loglevel=INFO --concurrency=1

-------------- celery@niks-pop-os v5.5.3 (immunity)
--- ***** -----
-- ******* ---- Linux-6.16.3-76061603-generic-x86_64-with-glibc2.35
- *** --- * ---
- ** ---------- [config]
- ** ---------- .> app:         core:0x73c5df0f4c10
- ** ---------- .> transport:   redis://localhost:6379/0
- ** ---------- .> results:     disabled://
- *** --- * --- .> concurrency: 8 (prefork)
-- ******* ---- .> task events: OFF (enable -E to monitor tasks in this worker)
--- ***** -----
-------------- [queues]
                .> celery           exchange=celery(direct) key=celery

[tasks]
  . tasks.tasks.long_task
  . tasks.tasks.short_task
The Celery worker will display some basic configuration, along with a list of the registered tasks. As you can see, the worker successfully picked up both of the task registrations.
Next, navigate to http://localhost:8000/short-task/ in your browser. You should get a response similar to this one:
{
  "message": "Short task has been started.",
  "task_id": "5578cae5-0d61-4544-bf1c-047f991b81c3"
}
Looking at the worker logs, you'll see that the task was successfully picked up by the worker and completed after 5 seconds:
Task short_task[e6f0...] received
Task short_task[e6f0...] succeeded in 5s: 'Short task completed successfully.'
The response was also immediate since the task was executed asynchronously.
Persist task results
To keep track of task statuses and store their results in the database, we’ll use django_celery_results. It’s a lightweight Celery extension that integrates with Django’s ORM, making it easy to save and view task states directly in the database.
First, install it via pip:
pip install django_celery_results==2.6.0Also, add it to your requirements.txt.
Next, add it to the bottom of INSTALLED_APPS in settings.py:
# core/settings.py

INSTALLED_APPS = [
    # ...
    "django_celery_results",
]
After that, add the four additional settings at the bottom of the file:
# core/settings.py

CELERY_RESULT_BACKEND = "django-db"
CELERY_TASK_TRACK_STARTED = True
CELERY_TASK_PUBLISH_RETRY = True
CELERY_RESULT_EXTENDED = True
These settings instruct Celery to store task results in the Django database, track when tasks begin, and retry publishing tasks in the event of a broker error. The extended result option ensures that additional metadata, such as task arguments and runtime information, is saved with each result.
Migrate the database:
$ python manage.py migrateFinally, fetch the TaskResults in index_view() and pass them as context to the template:
# tasks/views.py

def index_view(request):
    task_results = TaskResult.objects.annotate(
        duration=F("date_done") - F("date_created")
    )

    return render(
        request,
        "tasks/index.html",
        {
            "task_results": task_results,
        },
    )
Don't forget about the imports at the top of the file:
from django.db.models import F
from django_celery_results.models import TaskResult
Before testing, ensure to restart the Celery worker. You can use CTRL + C and then re-run the worker command.
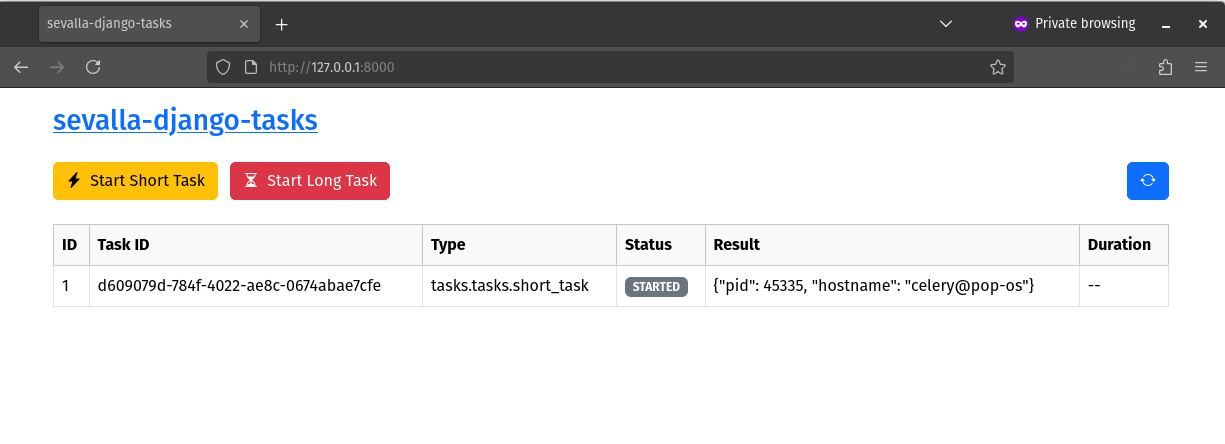
The dashboard at http://localhost:8000/ should now be fully functional. Try kicking off a short task by clicking on the "Start Short Task" button. After around 5 seconds, try refreshing the table to see if the task completes successfully.
To see what's going on under the hood, review the tasks/index.html template.
Congratulations, you've successfully set up Django with Celery. Moreover, you've configured django_celery_results to persist results in the Django ORM automatically.
Conclusion
Leveraging task queues is a powerful way to make your Django applications faster and more scalable by offloading time-consuming operations to background workers. It keeps your web requests quick and ensures that complex tasks don't block the main process.
The final source code is available on GitHub.
Future steps
- Look into Flower for monitoring and managing Celery clusters in production.
- To make development easier, consider dockerizing the whole setup. You'll want to create a Docker Compose with
django,redis, andceleryservices. - Look into Celery Beat if your project deals with periodic tasks.
If you wish to quickly deploy the implemented setup, consider testing out Sevalla. You'll receive $20 in free credits when you sign up.