How to deploy a Hugo site to Sevalla for free with Static Site Hosting
Hugo is a popular open-source static site generator (SSG) designed to help developers build and manage websites quickly and efficiently. You can use it to create blogs, portfolios, and other websites that don't require dynamic data.
When you build a site with Hugo, you'll need somewhere to host it so others can access it. This is where Sevalla's free Static Site Hosting comes in.
Understanding Sevalla Static Site Hosting
Sevalla Static Site Hosting is a free service for hosting static websites. It serves prebuilt HTML, CSS, and JavaScript files that don't require server-side processing or a database.
It works by connecting a repository hosted on a Git provider, such as GitHub, GitLab, or Bitbucket, to your Sevalla account and deploying your static site files.
Sevalla can automatically build sites that use Node.js-based build processes. However, Hugo is written in Go, so you'll need additional configuration or a separate build process to deploy your site.
In this article, we'll look at three ways to deploy your Hugo site to Sevalla for free.
Deploy your Hugo site to Sevalla Static Site Hosting
There are three ways to deploy your Hugo site to Sevalla:
- Build your website using continuous integration and continuous deployment (CI/CD), then deploy the generated files.
- Use the hugo-bin developer dependency.
- Build your site locally and deploy the generated static files.
We'll go through each method.
Prerequisites
To follow along with this tutorial, we assume you have:
- Experience with Hugo and Git.
- A Hugo site running locally.
- A Git repository for your Hugo project.
- A Sevalla account.
If you're new to Hugo, you can start with our guide to building a static site with Hugo.
Build your site with CircleCI and deploy to Sevalla
For the first method, we'll use CircleCI as our CI/CD tool. We'll create a workflow that builds the Hugo site and pushes the generated files to a separate branch named deploy. Sevalla will then publish the static files from that branch.
Advantages of using CI/CD
With this method, you don't need to build your site locally before pushing changes to your Git repository. CircleCI handles the build process, while Sevalla serves the generated files.
You can also add other jobs to your CI/CD configuration, such as linting and testing. By making the deployment job depend on the build job, you ensure that only successful builds are pushed to your deployment branch.
Step 1: Create the configuration file
Begin by creating a .circleci folder in your Hugo project's root directory. Inside this folder, create a config.yml file to define your workflow.
Your project structure should look something like this:
my-hugo-site/
├── .circleci/
│   └── config.yml
├── content/
├── layouts/
├── static/
└── hugo.toml
The exact structure may differ depending on your Hugo version and theme.
Step 2: Push your code to a Git repository
Create a repository on GitHub and push your Hugo project to it.
For this example, we'll use GitHub and assume your main development branch is named main.
The source code will remain on main, while the generated static files will be stored on the deploy branch.
Step 3: Create an orphan branch
Next, create an empty orphan branch called deploy, where CircleCI will push the generated static files.
Run the following commands from your project's root directory:
git switch main
git switch --orphan deploy
git rm -rf --cached . 2>/dev/null || true
git -c user.name="CI Setup" \
    -c user.email="[email protected]" \
    commit --allow-empty -m "Initialize deploy branch"
git push -u origin deploy
git switch main
An orphan branch has no shared commit history with your development branch. This allows us to keep the generated website files separate from the Hugo source code.
The branch starts with an empty commit. CircleCI will populate it when the first build completes.
Note: If your repository already has a deploy branch, don't recreate it. Check its contents and history before proceeding.
Step 4: Create a CircleCI account
Visit the CircleCI website and create an account if you don't already have one.
You can connect CircleCI to GitHub and authorize access to your repository.
Step 5: Configure your repository
After logging in, open your CircleCI dashboard, go to Projects, and select the repository you want to configure.
CircleCI can detect the configuration file in your repository. Follow the setup prompts to enable the project.
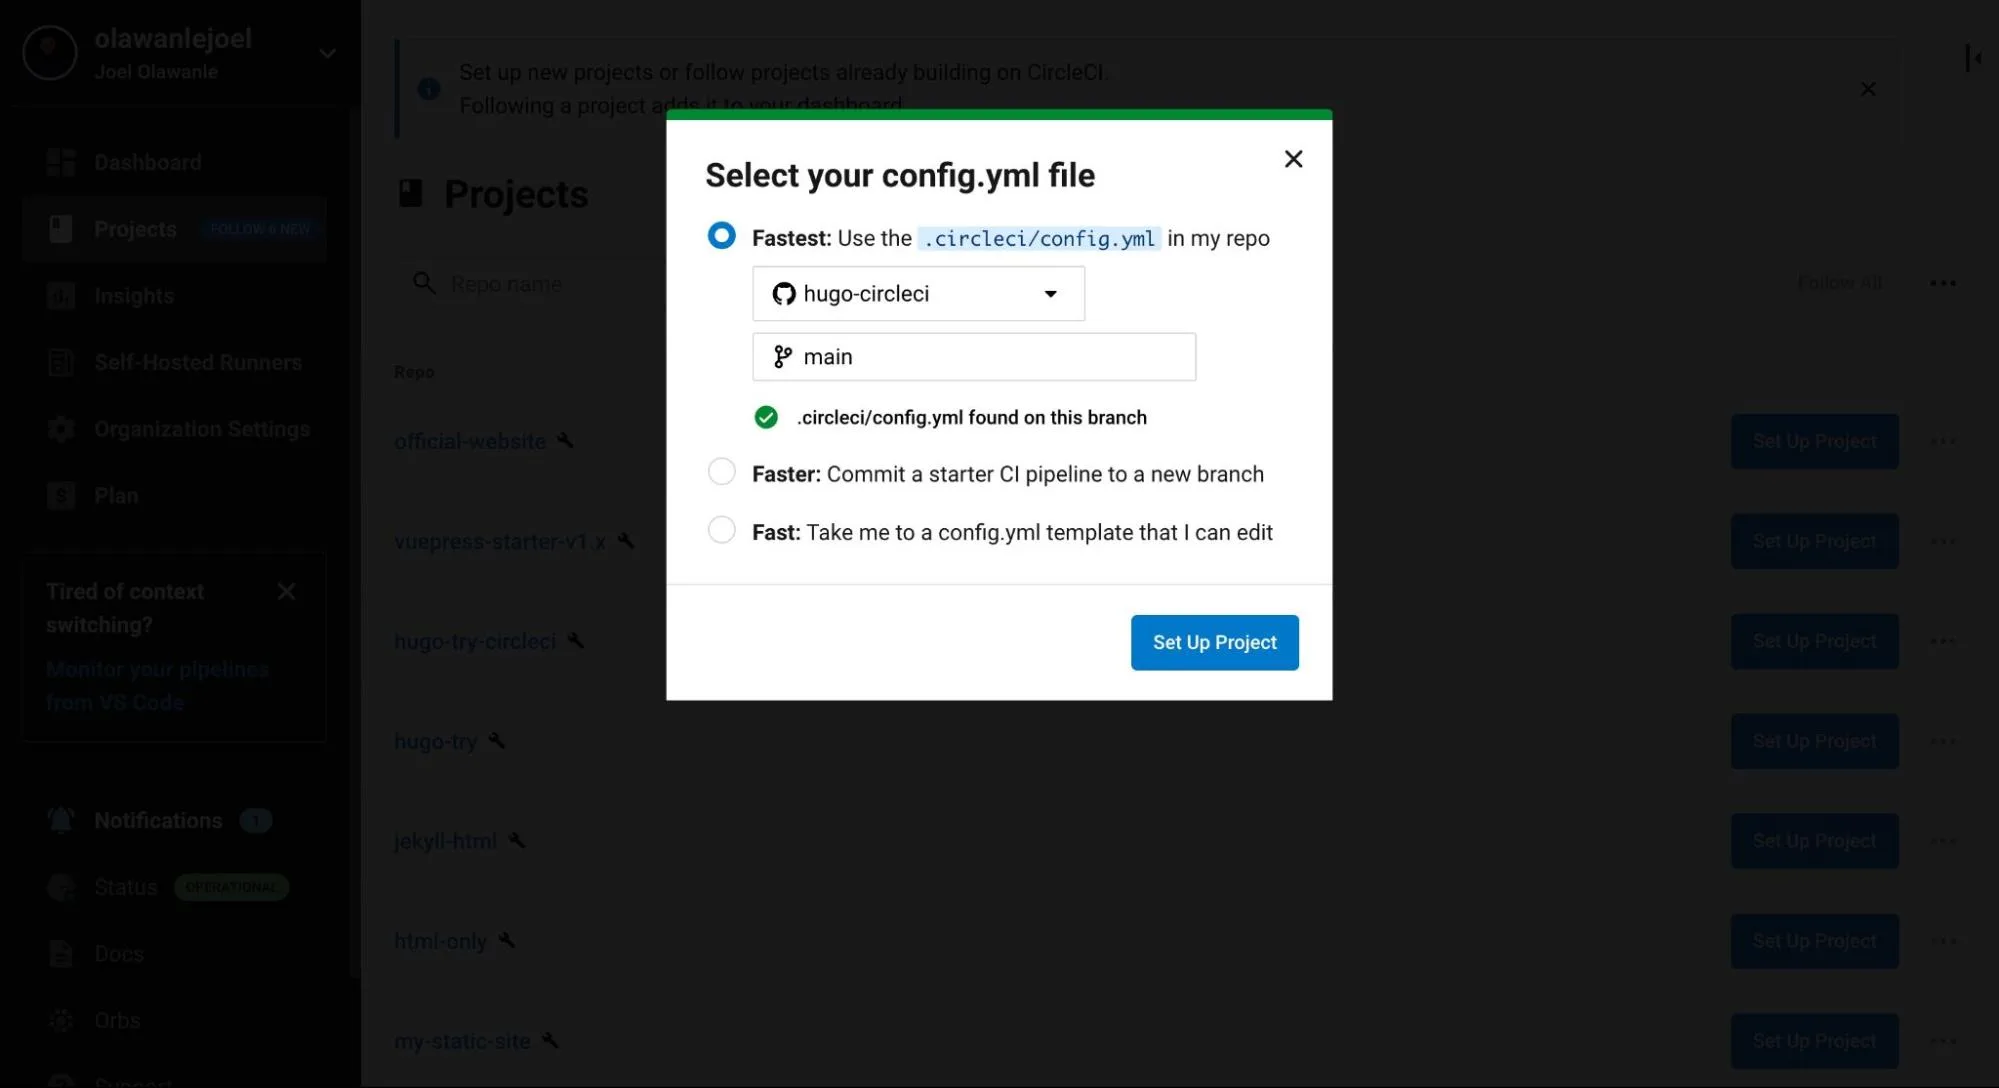
Once the project is configured, CircleCI can execute the workflow whenever you push changes to the branch specified in your configuration.
Step 6: Define the CircleCI configuration
Now let's configure the workflow.
Make sure you're working on your main branch and open .circleci/config.yml.
CircleCI uses configuration version 2.1:
version: 2.1We'll use two jobs:
build, which generates the Hugo site.push-build, which pushes the generated files to thedeploybranch.
The second job will run only after the first completes successfully.
Step 7: Define the executor
CircleCI jobs run inside an execution environment. For this example, we'll use a Docker image with Hugo available.
A maintained Hugo image can be used here. The example below uses the official Hugo image, which already includes Git and an SSH client, so CircleCI can check out your repository without any extra installation steps. The image is based on Alpine Linux and doesn't include Bash, so CircleCI runs the job's commands with /bin/sh instead, which works for the commands in this tutorial.
executors:
  hugo-executor:
    docker:
      - image: ghcr.io/gohugoio/hugo:latest
The latest tag is convenient for following the example, but for a production project, pin the image to a Hugo version you've tested with your site.
Step 8: Define the jobs
Next, define the two jobs that build and deploy the Hugo site.
Build job
The build job checks out the source code, initializes any Git submodules, builds the Hugo site, and saves the generated files for the next job.
jobs:
  build:
    executor: hugo-executor
    steps:
      - checkout

      - run:
          name: Initialize theme
          command: git submodule update --init --recursive

      - run:
          name: Build Hugo site
          command: hugo --destination workspace/public --minify

      - persist_to_workspace:
          root: workspace
          paths:
            - public
Here's what happens:
checkoutretrieves your project's source code.git submodule update --init --recursiveinitializes any Git submodules used by your project, including themes installed as submodules.hugo --destination workspace/public --minifygenerates the static site and places the output inworkspace/public.persist_to_workspacemakes the generated files available to the next job.
If your Hugo project doesn't use Git submodules, you can remove the initialization step.
Push-build job
The push-build job takes the generated files and pushes them to the deploy branch.
Before configuring this job, you'll need to give CircleCI permission to push to your GitHub repository.
For GitHub repositories, you can use a dedicated SSH deploy key with write access. Add the key in your repository's Settings > Deploy keys, then configure the corresponding private key in CircleCI's project settings.
Use the key's fingerprint in the CircleCI configuration.
The job will then use SSH to clone and push to the repository without embedding a personal access token in the repository URL.
  push-build:
    docker:
      - image: cimg/base:stable
    steps:
      - attach_workspace:
          at: /tmp/workspace

      - add_ssh_keys:
          fingerprints:
            - "REPLACE_WITH_DEPLOY_KEY_FINGERPRINT"

      - run:
          name: Push generated files to GitHub
          command: |
            set -eu

            git config --global user.name "CircleCI"
            git config --global user.email "[email protected]"

            git clone \
              --branch deploy \
              --depth 1 \
              [email protected]:YOUR_USERNAME/YOUR_REPOSITORY.git \
              deployment

            mkdir -p deployment/public

            find deployment/public -mindepth 1 -maxdepth 1 \
              -exec rm -rf -- {} +

            cp -a /tmp/workspace/public/. deployment/public/

            cd deployment

            git add -A

            if git diff --cached --quiet; then
              echo "No changes to deploy."
              exit 0
            fi

            git commit -m "Deploy ${CIRCLE_SHA1}"
            git push origin HEAD:deploy
Replace YOUR_USERNAME, YOUR_REPOSITORY, and REPLACE_WITH_DEPLOY_KEY_FINGERPRINT with your GitHub repository details and the SSH key fingerprint configured in CircleCI.
This job:
- Retrieves the generated files saved by the build job.
- Uses the configured SSH key to access your GitHub repository.
- Clones the
deploybranch. - Replaces the previous generated files with the latest build.
- Commits and pushes the changes only when the generated files have changed.
Removing the previous contents of public before copying the new build ensures that files deleted from your Hugo project don't remain in future deployments.
The check before git commit also prevents the job from failing when a build produces no changes.
Note: This example assumes that CircleCI has been configured to trust GitHub's SSH host key, that the deploy key has write access, and that no other process is simultaneously updating the deploy branch.
Step 9: Define the workflow
With both jobs configured, the next step is to create a workflow that runs when changes are pushed to main.
Add the following configuration:
workflows:
  build-and-deploy:
    jobs:
      - build:
          filters:
            branches:
              only:
                - main

      - push-build:
          requires:
            - build
          filters:
            branches:
              only:
                - main
The build job runs first. If it succeeds, CircleCI runs push-build, which updates the deployment branch.
The branch filters prevent this workflow from running on the deploy branch, avoiding a deployment loop when CircleCI pushes generated files.
Step 10: Commit and push
Once you've completed the configuration, commit the changes and push them to your Git repository.
git add .circleci/config.yml
git commit -m "Configure Hugo deployment with CircleCI"
git push origin main
CircleCI will detect the change and trigger the workflow.
Open your CircleCI dashboard to monitor the build and deployment jobs.
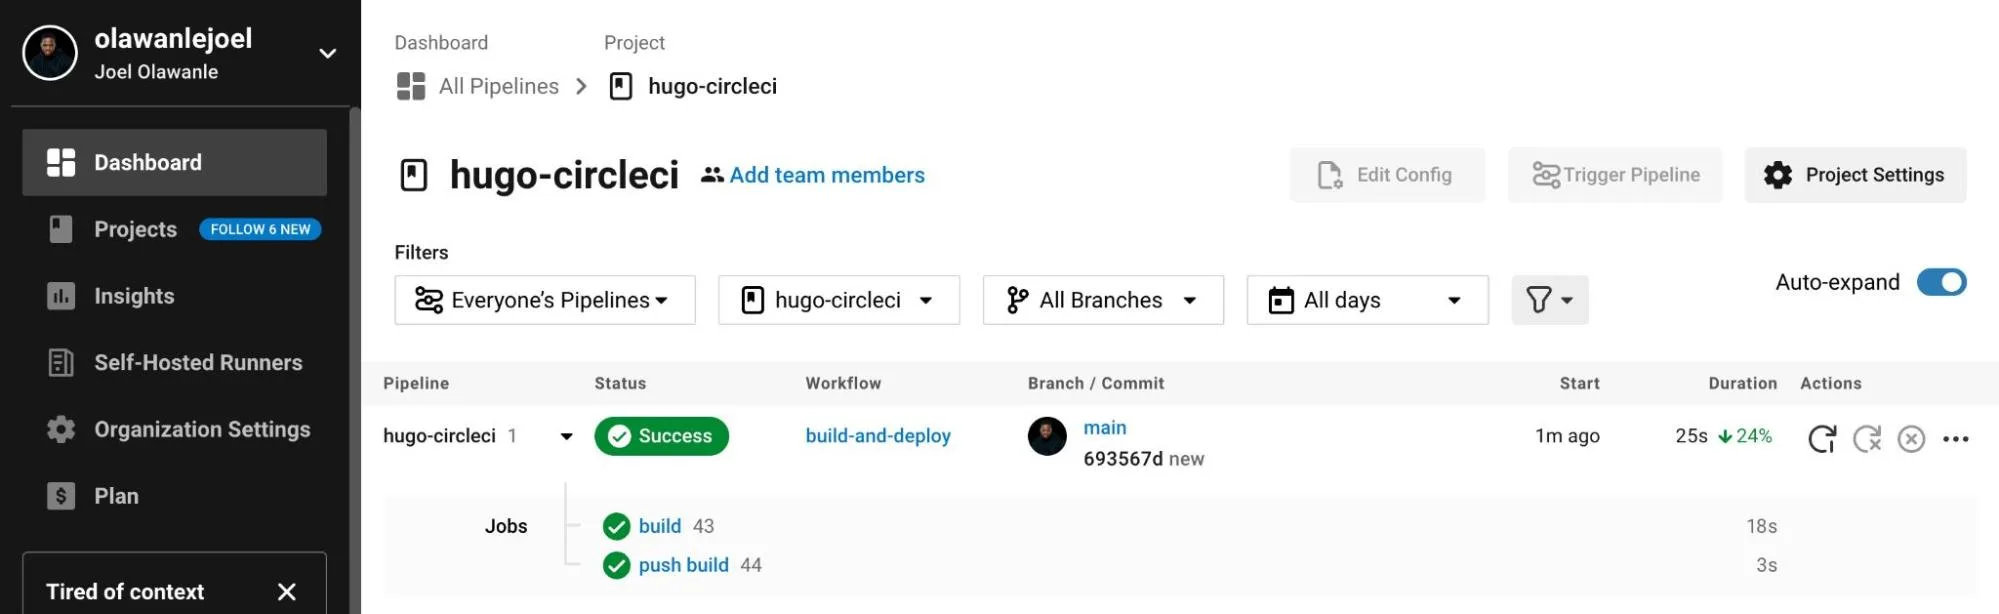
When the workflow completes successfully, check the deploy branch in GitHub. It should contain a public directory with your generated HTML, CSS, JavaScript, and other static assets.
You can also review the complete CircleCI configuration in the original sample repository. The configuration described here includes updates to the deployment process.
Step 11: Deploy static files to Sevalla
With CircleCI handling the build process, you can now deploy the generated files using Sevalla Static Site Hosting.
Follow these steps:
- Log in to your Sevalla dashboard.
- Open Static Sites and click Add site.
- Connect your Git provider if you haven't already.
- Select your repository and choose the
deploybranch. - Enter a unique name for your site. You can also assign it to an existing project.
- Enable Auto-deploy so Sevalla deploys the site whenever CircleCI pushes changes to the
deploybranch. - Under Build settings, leave Build site before publishing turned off, since CircleCI has already generated the files.
- Set the Publish directory to
public. - Click Create site to deploy your Hugo site.
Once the deployment finishes, click View to open your website.
You can also configure a custom domain and SSL certificate for your site.
From now on, whenever you push changes to main, CircleCI will build your Hugo site and update the deploy branch. Sevalla will detect the new commit and deploy the generated files automatically.
Using hugo-bin to build and deploy your Hugo site to Sevalla
The hugo-bin package is a binary wrapper for Hugo that makes it possible to run Hugo through Node.js commands.
This approach allows Sevalla to build your Hugo site directly, without requiring a separate CI/CD workflow.
To use hugo-bin in your Hugo project:
-
Initialize a Node.js project in the root directory of your Hugo site:
npm init -y -
Install
hugo-binandserveas development dependencies:npm install --save-dev hugo-bin serve -
Add the following scripts to your
package.jsonfile:{ "scripts": { "build": "hugo", "create": "hugo new", "serve": "hugo server" } }Add these scripts to your existing
package.jsonrather than replacing the entire file. -
Test the build locally:
npm run buildIf the build succeeds, Hugo generates the static files in the
publicdirectory. -
Commit your
package.json,package-lock.json, and project files, then push them to your Git repository.git add . git commit -m "Configure Hugo build with Node.js" git push origin mainEnsure
node_modulesis excluded from Git.
Important: Hugo themes are often installed as Git submodules. Sevalla's current documentation states that Git submodules are not supported for its Static Site Hosting build process. If your theme uses a submodule, make the theme files available directly in your repository before using this method.
Deploy the Hugo project to Sevalla
Once you've configured the project, follow these steps:
- Log in to your Sevalla dashboard.
- Go to Static Sites and click Add site.
- Select your Git provider, repository, and branch.
- Enter a unique name for your site.
- Enable Auto-deploy if you want Sevalla to build and deploy the site whenever you push changes.
- Under Build settings, enable Build site before publishing.
- Configure the build settings as follows:
- Build command:
npm run build - Node version:
lts - Publish directory:
public
- Build command:
- Click Create site.
Sevalla will install the Node.js dependencies, run the build command, and publish the generated static files.
If your project requires a particular Node.js version, select the compatible major version instead of lts.
You can monitor the build in the deployment logs to identify any dependency or configuration errors.
This method is useful when you want to keep your Hugo source code and deployment configuration in one repository without maintaining a separate CircleCI workflow.
Serving your static files only to Sevalla
Another way to deploy your Hugo site to Sevalla is to build it locally and push the generated files to your Git repository.
This approach is straightforward, but you'll need to rebuild the site whenever you make changes.
Start by running:
hugo --minifyHugo generates the website files in the public directory.
By default, many Hugo projects exclude the public directory from version control through .gitignore. If that's the case for your project, remove the relevant entry so Git can track the generated files.
You can then commit the generated files:
git add public
git commit -m "Update generated Hugo site"
git push origin main
If Git still ignores the directory, check whether another .gitignore rule is responsible.
Deploy the generated files
Once you've pushed the generated files to your Git repository:
- Log in to your Sevalla dashboard.
- Go to Static Sites and click Add site.
- Select the repository and branch containing your generated files.
- Enter a unique name for your site.
- Leave Build site before publishing turned off.
- Set the Publish directory to
public. - Click Create site.
Sevalla will deploy the files without running a build.
Alternatively, you can store only the generated static files in a separate Git repository. In that case, place the contents of public at the repository root and leave the Publish directory blank, so Sevalla serves files directly from the repository root.
This approach can be useful for smaller Hugo projects or sites that don't require frequent updates.
Deploy your Hugo site on Sevalla
You can deploy a Hugo site to Sevalla using any of the three methods covered in this article.
If you want automated builds with control over your CI/CD pipeline, CircleCI provides a way to build Hugo and push the generated files to a deployment branch. If you'd rather let Sevalla handle the build, hugo-bin makes that possible through Node.js. You can also build the site locally and deploy the generated files directly.
Whichever approach you choose, Sevalla can serve the resulting static files without requiring you to manage a web server.
Ready to deploy? Get started with Sevalla's free Static Site Hosting or explore the static site documentation for more information.