Run Django in production with Postgres, Valkey, and Celery
What you'll learn
By the end of this tutorial, you'll be able to:
- Deploy an app with PostgreSQL and Valkey databases
- Inspect, edit, back up, and restore Postgres data
- Work with Valkey keys
- Decide when to scale your databases.
Introduction
A production Django app rarely stops at Django. You usually need a relational database, a cache or queue, background workers, private networking, backups, and a way to understand when those resources need to scale.
The hard part is not getting each component running on its own. It is managing the stack as one production system without adding more tools and operational overhead than the application actually needs.
In this tutorial, you'll build and run a Django app with PostgreSQL, Valkey, and Celery on Sevalla. You'll connect the services over a private network, inspect and edit live database data, work with backups and restores, and use database metrics to decide when to scale.
By the end, you'll have a working example of a database-backed Django application with a relational database, cache and task queue, background worker, private service connectivity, backups, and a clear path for scaling as the workload grows.
How the app uses Postgres, Valkey, and Database Studio
The app this tutorial builds is a task manager. In the first two steps, you build the stack. The next two steps and the section on scaling operate it. This task manager app includes the following functionality:
- Two buttons that start tasks through the open-source async task management tool, Celery.
- A table that displays a summary of the results.
- A status bar that shows the number of finished tasks and success rate.
The app code has a home page view and two Celery views that start short and long tasks. Behind the scenes, there are a few more parts. Each is a job your team typically does by hand.
The app uses two databases. PostgreSQL stores the task results; Valkey holds the Celery job queue and provides a 'statistics' cache. A private connection from Sevalla links the app to both databases, without exposing either to the internet.
You also need a way to inspect the data. Database Studio has two workspaces, and you use both: one for SQL and one for 'key-value' pairs.
How to run and manage a database-backed Django app on Sevalla
You deploy the app, add a statistics cache, work with two databases in Database Studio, then decide when to scale them.
Before you start, check that you have the following prerequisites:
- A GitHub account. You start with forking a Django project that tracks task results. In the fork, you also edit two files in the browser.
- A Sevalla account. After the sign-up process, new users get free credit that covers everything you run in this tutorial.
- The right Sevalla user role. You need a Sevalla role that allows you to create applications and databases, such as Company Owner, Company Administrator, Company Developer, or a project role with creation permissions.
If you've read How to debug a production issue using Sevalla MCP, this app uses the same foundation. However, we recommend using a fresh fork of the initial GitHub repo.
1. Deploy the app with Postgres and Valkey
The workflow is similar to deploying a Django app to Sevalla, but with three jobs to carry out first:
- Set up a private route from the app to the databases.
- Deliver the database credentials without hard-coding them.
- Provide a place for the Celery worker to run alongside the web process.
Sevalla's dashboard handles all three, which reduces the time to go-live and lessens your technical burden.
This app and the previous guide differ in four ways: it uses a preconfigured fork; it uses Valkey rather than Redis; one connection variable may need an edit; and the start command binds to port 8080.
Setting up database connections in Sevalla
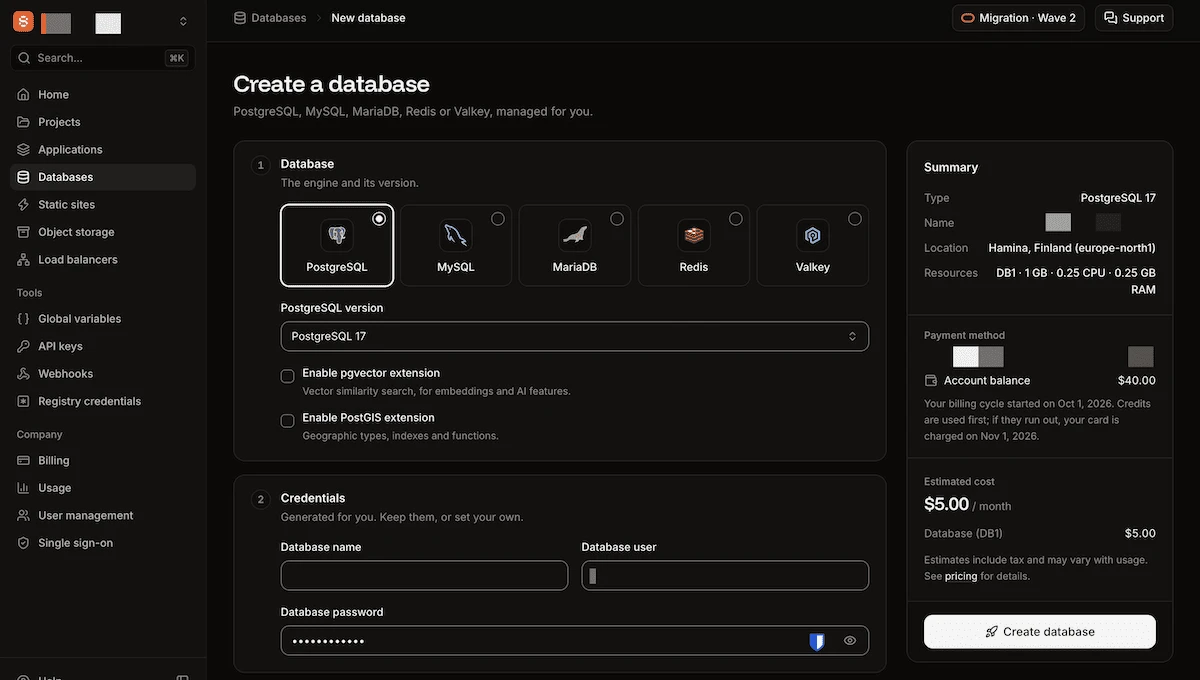
First, fork the app and stay on the main branch. Next, add two new databases in Sevalla: PostgreSQL 17 and Valkey 7.2. Both databases require the same region because internal connections only work inside one.
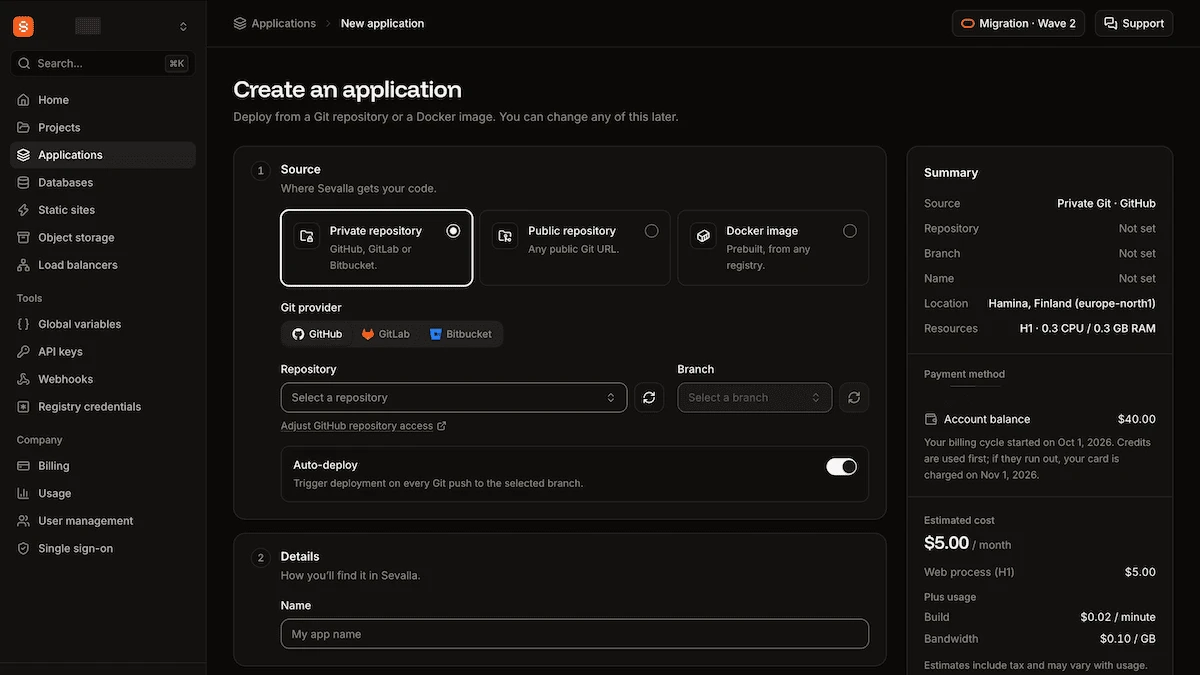
Next, create the app from the main branch of your fork. Turn on Auto-deploy and use the same region as the databases.
This first build fails because there are no internal connections. To add them, head to the Networking screen in the app's settings and click Add internal connection:
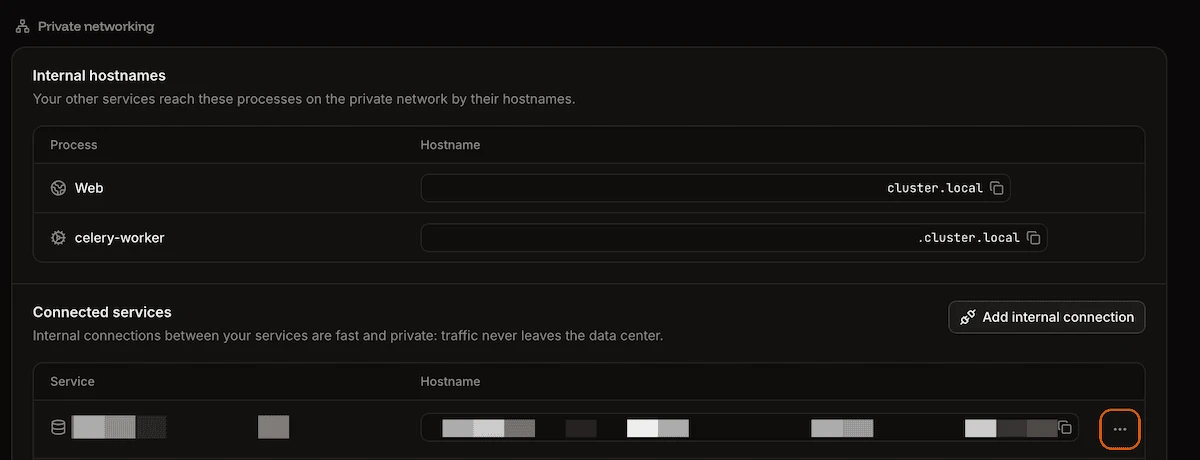
You repeat this for each database. Once you select the database, add an environment variable. The dialog lists the right name: DB_URL for Postgres and REDIS_URL for Valkey. Sevalla puts the connection details into the variables for you.
A team typically builds the network routing, connection restrictions, and credential management manually. Databases in Sevalla are private by default. An internal connection stays on Sevalla's network and works inside one region. This means you don't need to set up IP allowlists or copy credentials into the codebase or settings file.
Here, Sevalla supplies the URL and the code decides how to read it. The Python Redis client doesn't accept valkey:// in the URL. Sevalla's Valkey URLs start with redis://, but a connection added before October 30, 2026 can still start with valkey://. If yours does, change it to redis://, then save.
Setting up worker processes
A team typically provisions a second server for Celery and installs a process manager to keep the worker running. Head to the Processes screen, which is where you set the web process start command. In Sevalla, click Update process in the web process's menu to set the start command, enter the following, and save your changes:
python manage.py migrate && gunicorn core.wsgi -b 0.0.0.0:8080Next, follow our guide on creating background tasks in a Django app to build a worker process. Use the following start command, then click Create process:
celery -A core worker -c 1 -l INFOThe worker is a second process of the same app, as it runs from the same repo as the fork and reads the same environment variables. It's why DB_URL and REDIS_URL need no additional setup.
Testing the connection
To start testing the connection, select Deployments > Deploy now to run the app and monitor it from the same screen. To view the front end, you can click the View button on the Overview screen or grab the URL from the Domains screen. The app shows a yellow notification stating that no tasks are found.
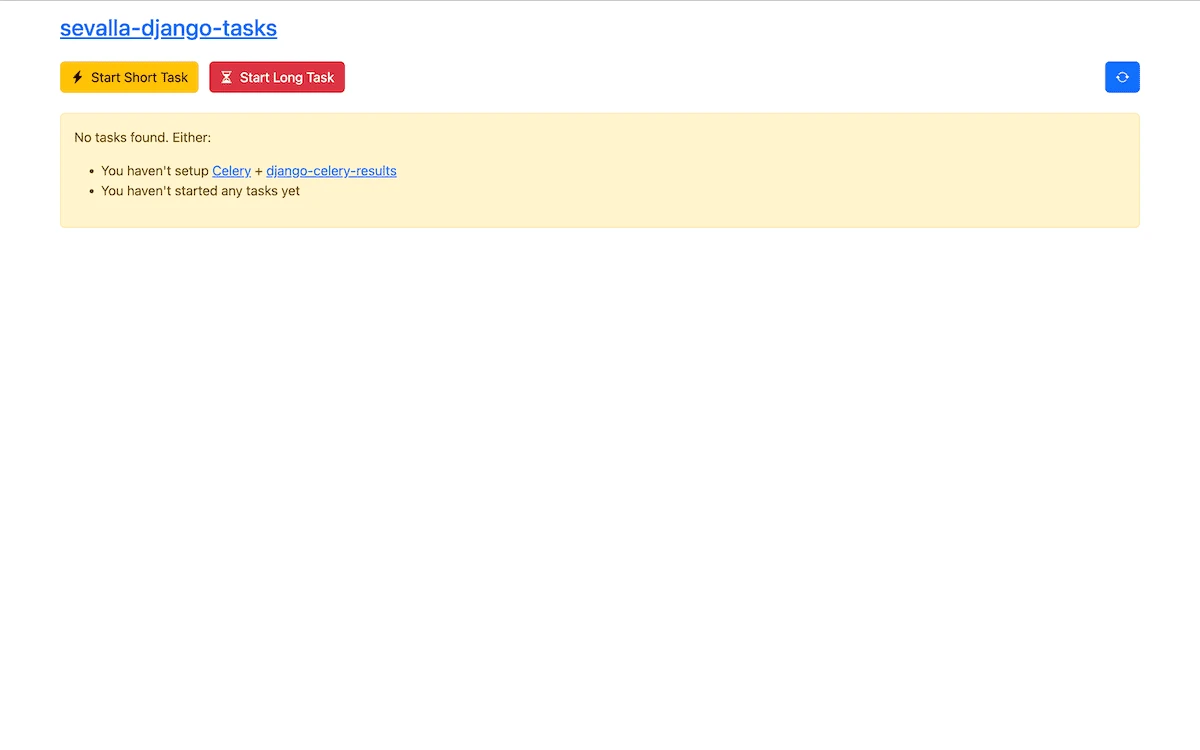
Next, click Start Short Task. When you refresh the page using the blue button on the right-hand side, a task appears. Look for the SUCCESS label. Seeing the label confirms that the databases and worker are linked and working. The whole stack now runs, so the app assembly is complete.
2. Add a statistics cache
Valkey already holds the Celery queue, so the cache needs no new variables. Only the app code changes.
Our post on handling long-running tasks in Django explains the task queue and results table.
The code you add achieves three things:
- It checks Valkey for stats:summary.
- If that key is missing, it counts the finished tasks in Postgres.
- Then, it writes the result back to Valkey with a 30-second Time to Live (TTL).
The cache stops the page recounting every task on page load. You edit two files to set it up. First, replace everything in tasks/views.py using GitHub's in-browser file editor:
import json
import os
from datetime import datetime, timezone

import redis
from django.db.models import F
from django.http import JsonResponse
from django.shortcuts import render
from django_celery_results.models import TaskResult

from .tasks import short_task, long_task

STATS_KEY = "stats:summary"
STATS_TTL = 30  # seconds


def get_stats():
    # Read the stats from Valkey. If the key is missing or expired, query Postgres.
    client = redis.Redis.from_url(
        os.environ["REDIS_URL"], decode_responses=True
    )
    cached = client.get(STATS_KEY)

    if cached:
        stats = json.loads(cached)
        stats["source"] = "Valkey cache"
        return stats

    finished = TaskResult.objects.filter(status__in=["SUCCESS", "FAILURE"])
    total = finished.count()
    success = finished.filter(status="SUCCESS").count()

    stats = {
        "total": total,
        "success_rate": round(success / total * 100) if total else 0,
        "computed_at": datetime.now(timezone.utc).strftime("%H:%M:%S UTC"),
    }

    client.setex(STATS_KEY, STATS_TTL, json.dumps(stats))
    stats["source"] = "Postgres"
    return stats


def index_view(request):
    task_results = TaskResult.objects.annotate(
        duration=F("date_done") - F("date_created")
    )

    return render(
        request,
        "tasks/index.html",
        {
            "task_results": task_results,
            "stats": get_stats(),
        },
    )


def short_task_view(request):
    task = short_task.delay()
    return JsonResponse(
        {
            "message": "Short task has been started.",
            "task_id": task.id,
        }
    )


def long_task_view(request):
    task = long_task.delay()
    return JsonResponse(
        {
            "message": "Long task has been started.",
            "task_id": task.id,
        }
    )
Save these changes, then open tasks/templates/tasks/index.html in the same editor. Add the following above the {% if not task_results %} line:
<div class="alert alert-info">
<strong>{{ stats.total }}</strong> finished tasks ·
<strong>{{ stats.success_rate }}%</strong> success rate ·
source: <strong>{{ stats.source }}</strong> ·
computed at {{ stats.computed_at }}
</div>Once you save your changes and wait for the auto-deployment to finish, check out the app on the front end. It shows a blue status bar:
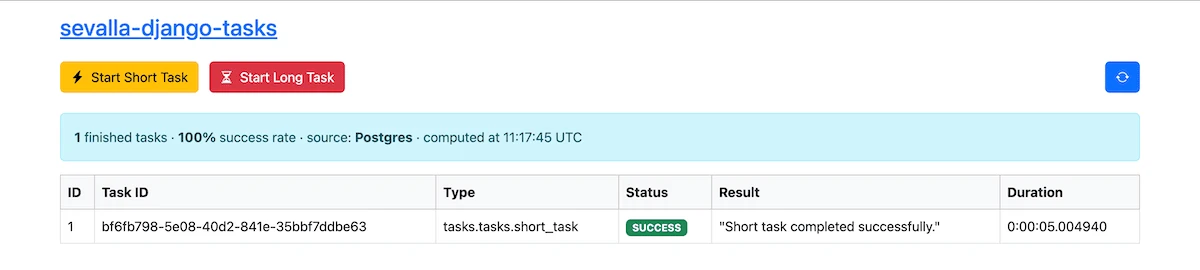
Through the get_stats() and index_view() functions, the template displays the finished task count, the success rate, the computation time, and the source (source: Postgres). You can click the Start Short Task and Start Long Task buttons to queue jobs for the worker. With a valid cache, the bar displays source: Valkey cache. Otherwise it's Postgres for data from an expired or nonexistent cache.
Both databases now hold live data: Postgres holds the task results and Valkey holds the queue and the cache.
3. Inspect, edit, and recover Postgres data in Database Studio
With an app that's live and storing results, you need to know how to check rows and fix values. The typical route is through installing a desktop SQL client. This needs public access to the database, but Sevalla's databases are private by default. This means you turn on public access, then restrict who connects using an allowlist.
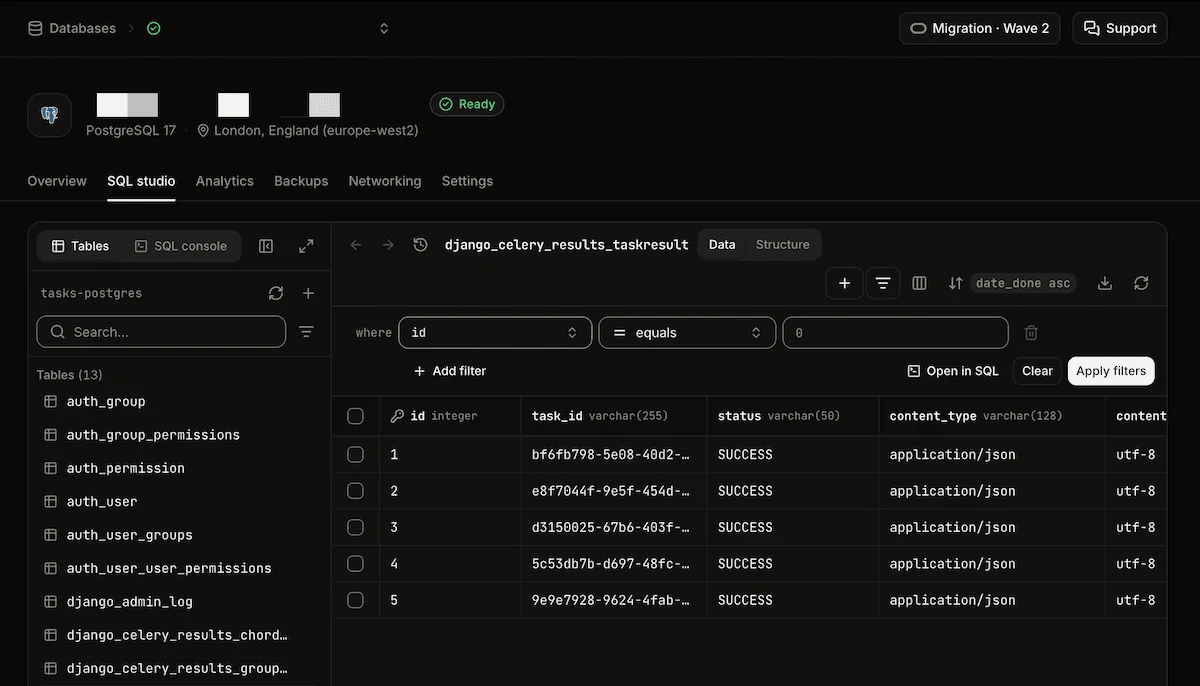
Instead, Sevalla's Database Studio opens from Databases > [database] > Redis studio/SQL studio within your Sevalla dashboard. It lets you manage databases without a third-party database editor. The SQL workspace shows you the table grid, filters, and an SQL console.
Taking a backup of your databases
Before working with the live data, back it up. Within a typical manual workflow, teams write scheduled jobs that dump the database, then decide where to store the files (and for how long). Teams often skip a restore script until they need it.
Sevalla's databases take automatic daily backups. You can also carry out a manual backup before a high-risk change.
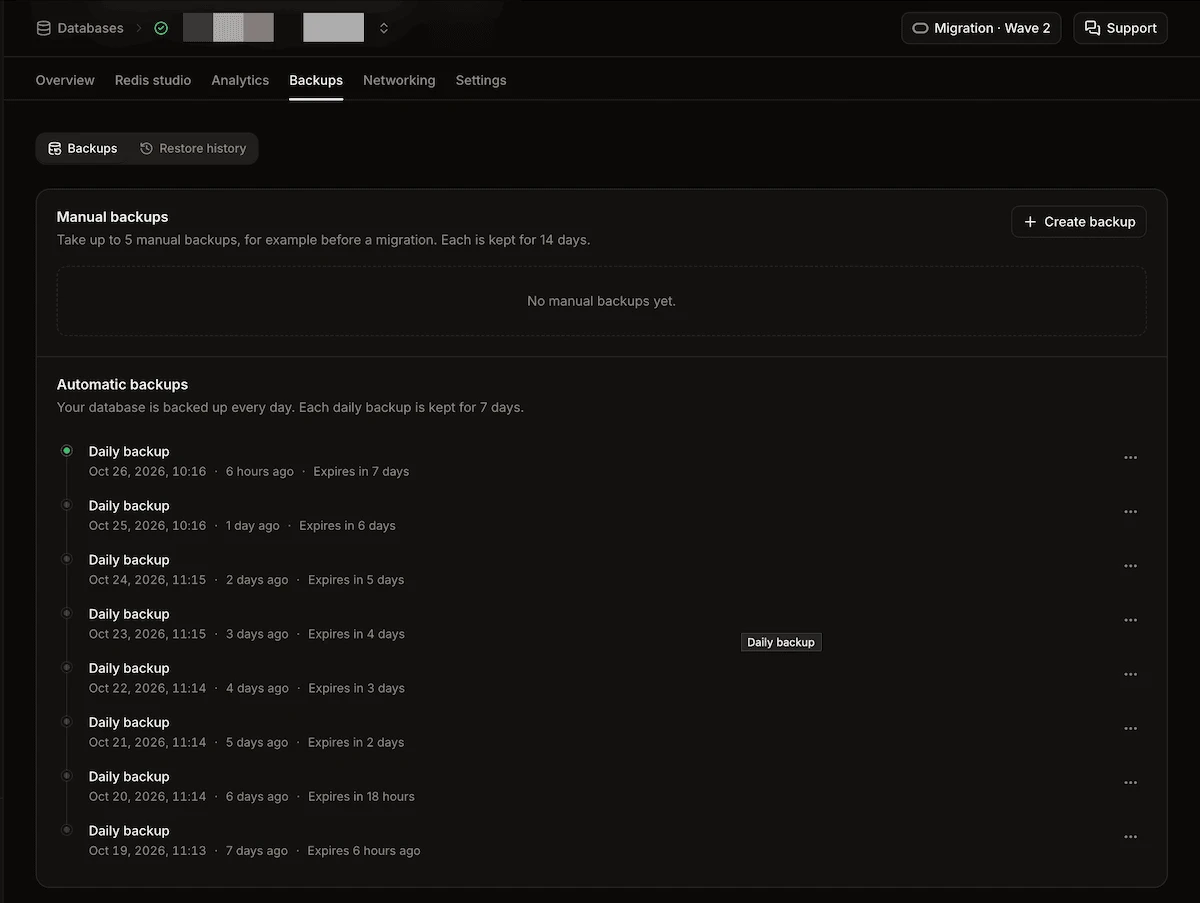
To do this, open the Backups tab, click Create backup, then type an identifying note. To finish, click Create database backup.
Inspecting the live data
To inspect the live data, you use the built-in filters and console:
- Open the django_celery_results_taskresult table.
- Filter the status to SUCCESS.
- Run SELECT status, COUNT(*) FROM django_celery_results_taskresult GROUP BY status; from the SQL console.
Now, change one row's status to FAILURE and save your changes. After 30 seconds, refresh the front end and see the success rate statistic change:
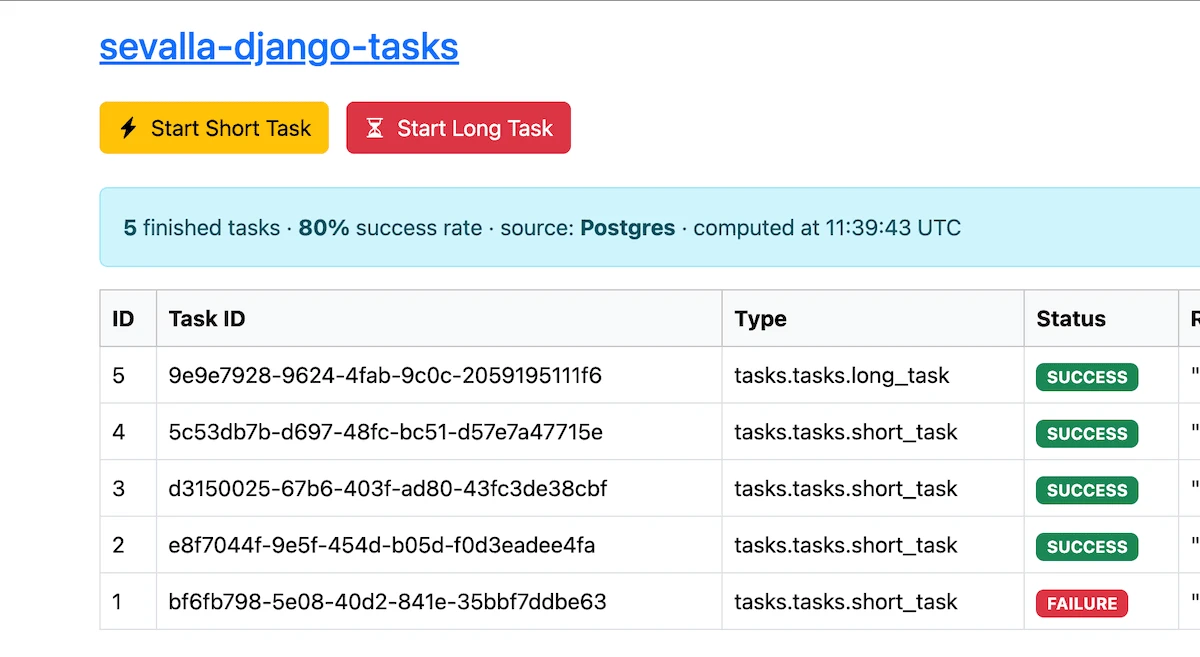
Any changes you make to the database contents change the statistics. To undo the edit, restore a backup. Each backup has a Restore option in its More Items menu. You click this, then choose Restore to source. To confirm, type the database name and click Restore backup.
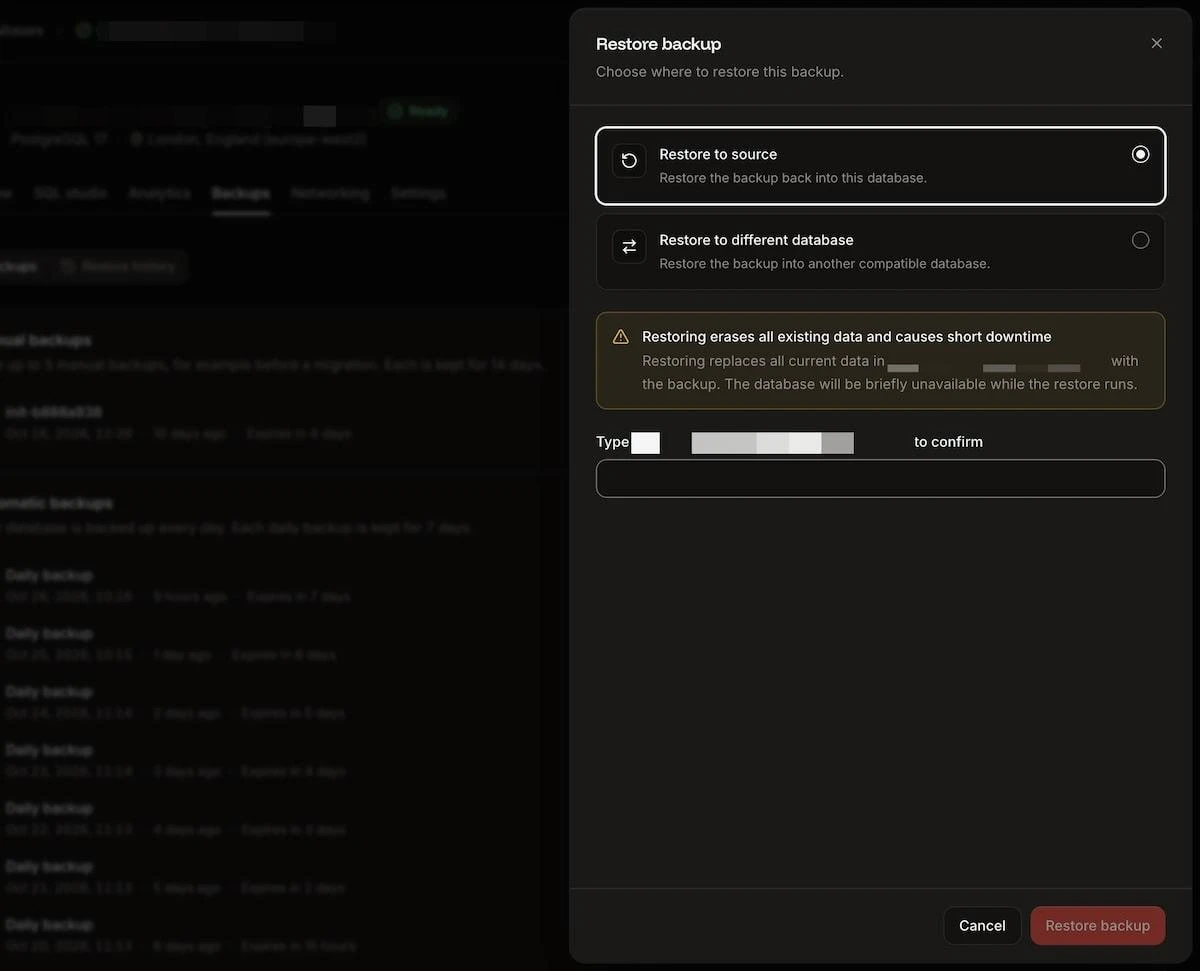
This overwrites the current contents of the database. After 30 seconds, reload the app to see the data return to its earlier values. These menu options replace the script you otherwise have to write and maintain.
4. Inspect and edit Valkey data in Database Studio
Valkey holds a cache the app rebuilds and the task queue. It's the Postgres backup that protects the data you can't rebuild. A second database typically needs a second client (such as redis-cli or a desktop client), with its own credentials.
Database Studio opens the key-value workspace in the same way as the SQL one, with no need for an extra client or credentials.
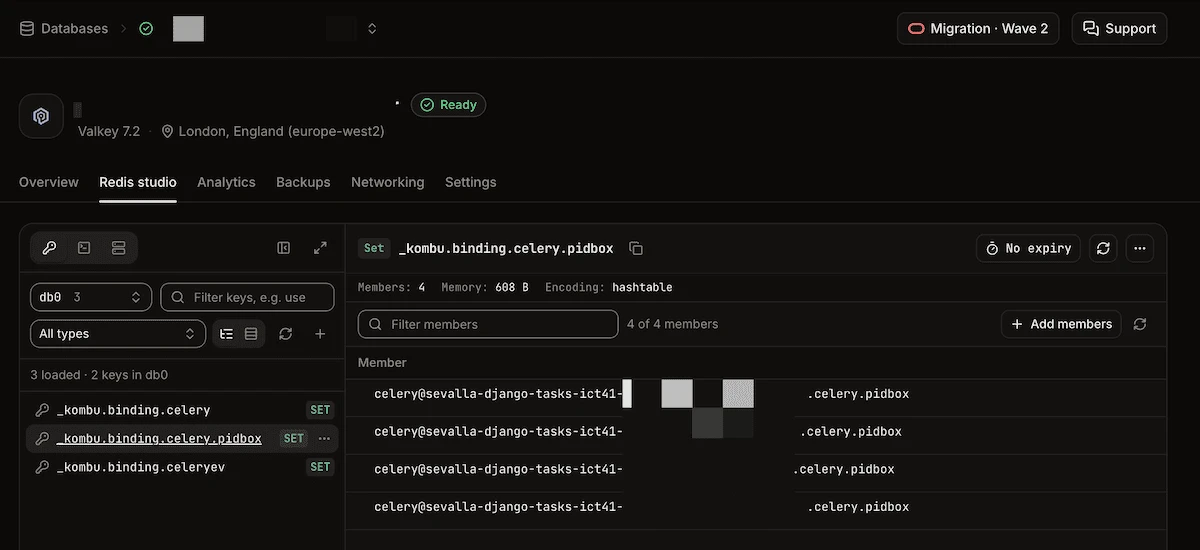
This app uses a few key types. For instance, the Keys tab shows _kombu.binding.* keys. Celery manages these _kombu keys. The stats:summary key shows once you load the app's front end, and it expires based on its TTL value. Load the app, then refresh the Keys tab within 30 seconds.
You can filter for this on the Keys tab using the stats:* pattern:
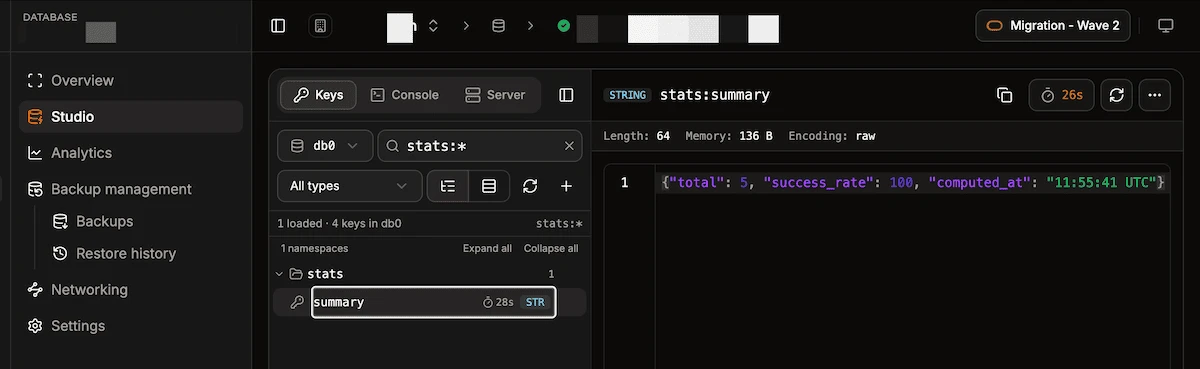
stats:summary is a string key that holds JSON. Set the TTL to 300 seconds using the Set TTL menu item, then wait 30 seconds before refreshing the app. The source still reads Valkey cache on the front end rather than revert to Postgres.
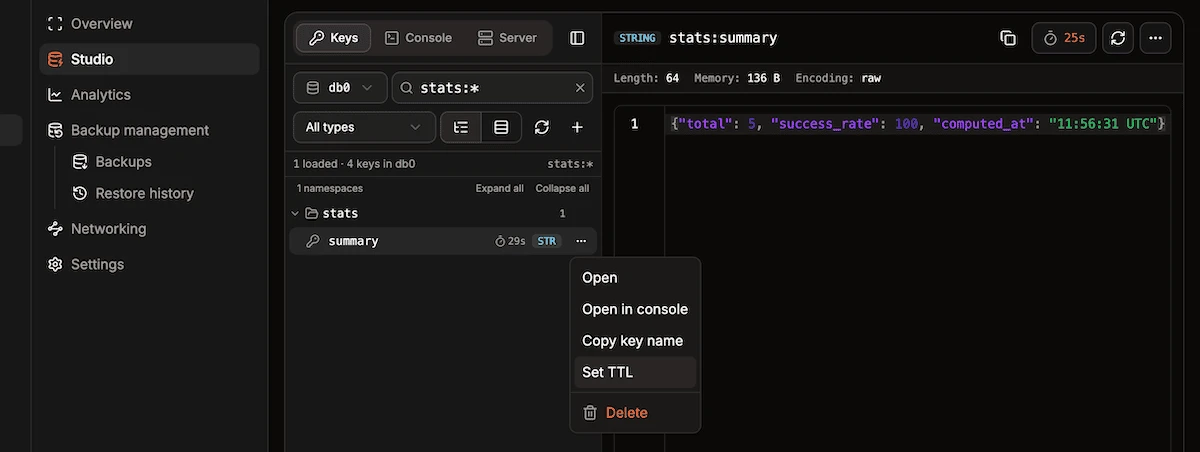
You can also edit the key's value. For instance, change it to the following:
{"total": 99, "success_rate": 12, "computed_at": "edited in studio"}Reload the front end, and the status bar shows the edited values:
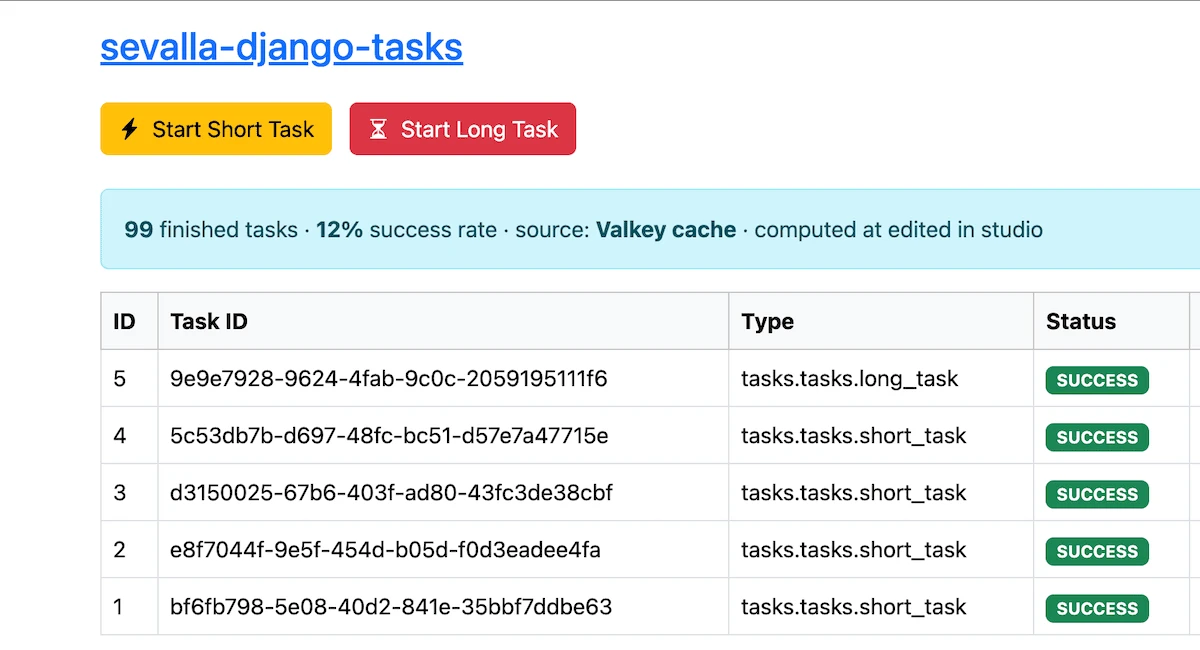
If you delete the key, the app recalculates the numbers from the Postgres database. For other keys, you can create a scratch hash in Database Studio (through Add key), rename the key, set a TTL, and delete the hash.
You can also run console commands from the Console tab. These run against the live database, so be careful with commands such as FLUSHALL and DEL.
Scale the databases as the workload grows
Running an app such as this also means noticing when a database outgrows its size. The typical solution is to run a monitoring tool for each database that tracks memory, slow commands and connections, and more. Each tool also comes with a separate dashboard.
The Server tab in the key-value workspace shows Valkey's memory usage, slow log, and connected clients at a glance.
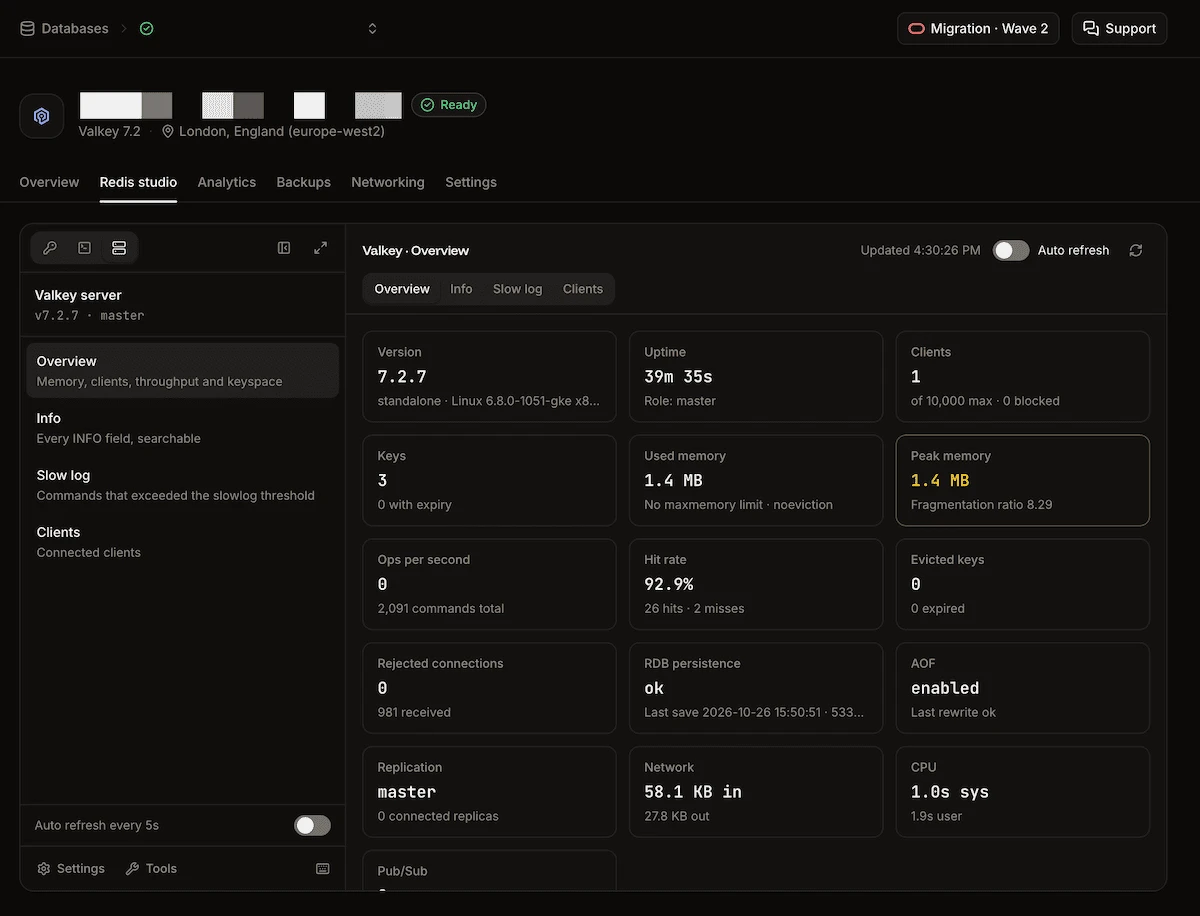
Rising memory usage or slow commands in the Server tab signal that Valkey needs a larger size. However, a database can't get smaller, only larger. For a smaller database, you create a new one, restore a backup to it, build the connection, and delete the old database.
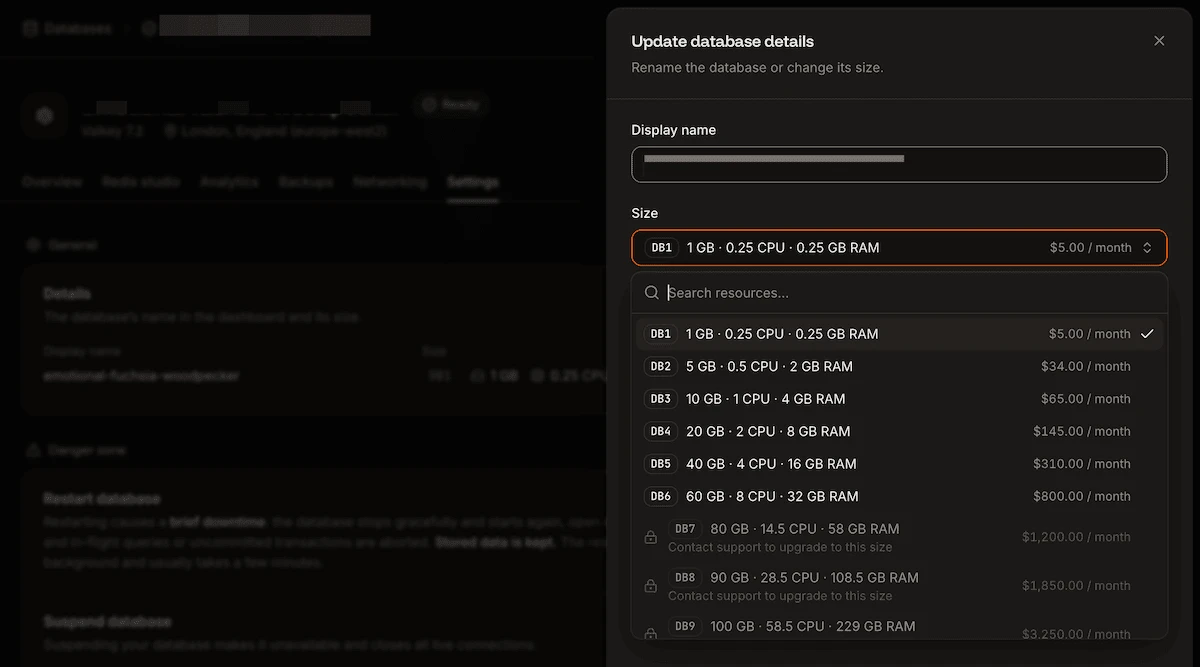
Within the Settings > General > Update details screen, choose the next size up for your databases and confirm your selection.
Sevalla gives you the built-in tools to manage databases for your application
A production Django app needs more than application code. It needs workers, databases, private networking, backups, monitoring, and a way to scale. On a DIY infrastructure stack, your team has to assemble, manage, and maintain those pieces. On Sevalla, your application team doesn't have to become an infrastructure team.
Sevalla handles the operational layer around the app. It delivers database credentials through environment variables. Workers run alongside the web process. Database Studio lets you inspect Postgres and Valkey without separate clients or credentials. Backups run automatically, restores are built in, and database metrics and scaling controls live in the same platform.
The result is a production Django stack without another collection of infrastructure tools and processes to operate. If you want to spend less time managing the stack behind your application, fork the repo and deploy it on Sevalla.