Building GraphQL APIs with Node
GraphQL is the new buzzword in API development. While RESTful APIs remain the most popular way to expose data from applications, they come with many limitations that GraphQL aims to solve.
GraphQL is a query language created by Facebook, which was turned into an open-source project in 2015. It offers an intuitive and flexible syntax for describing and accessing data in an API.
This guide will explore how to build a GraphQL Node.js project. We'll use GraphQL to build a Todo application in the Express.js web framework for Node.
What is GraphQL?
From the official documentation: "GraphQL is a query language for APIs and a runtime for fulfilling those queries with your existing data. GraphQL provides a complete and understandable description of the data in your API, gives clients the power to ask for exactly what they need and nothing more, makes it easier to evolve APIs over time, and enables powerful developer tools."
GraphQL is a server-side runtime for executing queries using the type system you defined for your data. Also, GraphQL is not tied to any specific database or storage engine. Instead, it is backed by your existing code and data store. You can get a detailed comparison of these technologies with the GraphQL vs. RESTful API guide.
To create a GraphQL service, you start by defining schema types and creating fields using those types. Next, you provide a function resolver to be executed on each field and type whenever data is requested by the client side.
GraphQL terminology
GraphQL type system is used to describe what data can be queried and what data you can manipulate. It is the core of GraphQL. Let's discuss different ways we can describe and manipulate data in GraphQL.
Object types
GraphQL object types are data models containing strongly typed fields. There should be a 1-to-1 mapping between your models and GraphQL types. Below is an example of GraphQL Type:
type User {
  id: ID! # The "!" means required
  firstname: String
  lastname: String
  email: String
  username: String
  todos: [Todo] # Todo is another GraphQL type
}
Queries
GraphQL Query defines all the queries that a client can run on the GraphQL API. You should define a RootQuery that will contain all existing queries by convention.
Below we define and map the queries to the corresponding RESTful API:
type RootQuery {
  user(id: ID): User           # Corresponds to GET /api/users/:id
  users: [User]                # Corresponds to GET /api/users
  todo(id: ID!): Todo    # Corresponds to GET /api/todos/:id
  todos: [Todo]          # Corresponds to GET /api/todos
}
Mutations
If GraphQL Queries are GET requests, mutations are POST, PUT, PATCH, and DELETE requests that manipulate GraphQL API.
We will put all the mutations in a single RootMutation to demonstrate:
type RootMutation {
  createUser(input: UserInput!): User             # Corresponds to POST /api/users
  updateUser(id: ID!, input: UserInput!): User    # Corresponds to PATCH /api/users
  removeUser(id: ID!): User                       # Corresponds to DELETE /api/users
  createTodo(input: TodoInput!): Todo
  updateTodo(id: ID!, input: TodoInput!): Todo
  removeTodo(id: ID!): Todo
}
You noticed the use of -input types for the mutations such as UserInput, TodoInput. It is always best practice to always define Input types for creating and updating your resources.
You can define the input types like the one below:
input UserInput {
  firstname: String!
  lastname: String
  email: String!
  username: String!
}
Resolvers
Resolvers tell GraphQL what to do when each query or mutation is requested. It is a basic function that does the hard work of hitting the database layer to do the CRUD (create, read, update, delete) operations, hitting an internal RESTful API endpoint, or calling a microservice to fulfill the client's request.
You can create a new resolvers.js file and add the following code:
import sequelize from "../models"

export default function resolvers() {
  const models = sequelize.models

  return {
    // Resolvers for Queries
    RootQuery: {
      user(root, { id }, context) {
        return models.User.findByPk(id, context)
      },
      users(root, args, context) {
        return models.User.findAll({}, context)
      },
    },
    User: {
      todos(user) {
        return user.getTodos()
      },
    },
    // Resolvers for Mutations
    RootMutation: {
      createUser(root, { input }, context) {
        return models.User.create(input, context)
      },
      updateUser(root, { id, input }, context) {
        return models.User.update(input, { ...context, where: { id } })
      },
      removeUser(root, { id }, context) {
        return models.User.destroy({ ...context, where: { id } })
      },
      // ... Resolvers for Todos go here
    },
  }
}
Schema
GraphQL schema is what GraphQL exposes to the world. Therefore, the types, queries, and mutations will be included inside the schema to be exposed to the world.
Below is how to expose types, queries, and mutations to the world:
schema {
  query: RootQuery
  mutation: RootMutation
}
In the above script, we included the RootQuery and RootMutation we created earlier to be exposed to the world.
How does GraphQL work with Node.js and Express.js?
GraphQL provides an implementation for all major programming languages, and Node.js is not exempted. On the official GraphQL website, there is a section for JavaScript support, and also, there are other implementations of GraphQL to make writing and coding simple.
Apollo Server provides an implementation for Node.js and Express.js and makes it easy to get started with GraphQL.
You will learn how to create and develop your first GraphQL application in Node.js and Express.js backend framework using Apollo Server in the next section.
Setting up GraphQL with Express.js
Building a GraphQL API server with Express.js is straightforward to get started. In this section, we will explore how to build a GraphQL server.
Initialize project with Express
First, you need to install and set up a new Express.js project. Create a folder for your project and install Express.js using this command:
mkdir graphql-todo && cd graphql-todo
npm init -y
npm install express
The command above creates a new package.json file and installs the Express.js library into your project.
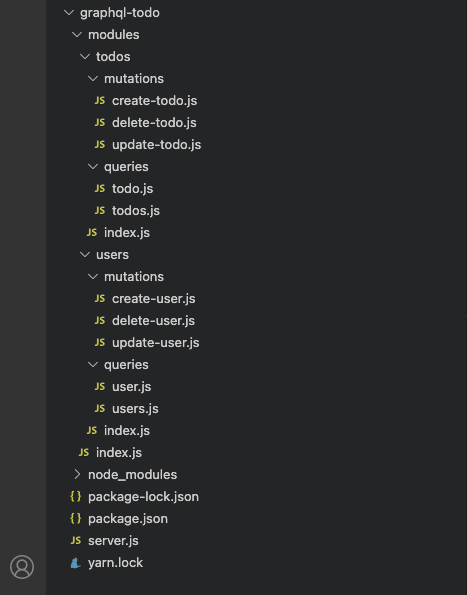
Next, we will structure our project as shown in the image below. It will contain different modules for the features of the project, such as users, todos, etc.
Initialize GraphQL
Let's start by installing the GraphQL Express.js dependencies. Run the following command to install:
npm install @apollo/server @as-integrations/express5 graphql @graphql-tools/schema corsCreating schemas and types
Next, we are going to create an index.js file inside the modules folder and add the following code snippet:
const users = require("./users")
const todos = require("./todos")
const { GraphQLScalarType } = require("graphql")
const { makeExecutableSchema } = require("@graphql-tools/schema")

const typeDefs = `#graphql
  scalar Time

  type Query {
    getVersion: String!
  }

  type Mutation {
    version: String!
  }
`

const timeScalar = new GraphQLScalarType({
  name: "Time",
  description: "Time custom scalar type",
  serialize: (value) => value,
})

const resolvers = {
  Time: timeScalar,
  Query: {
    getVersion: () => `v1`,
  },
}

const schema = makeExecutableSchema({
  typeDefs: [typeDefs, users.typeDefs, todos.typeDefs],
  resolvers: [resolvers, users.resolvers, todos.resolvers],
})

module.exports = schema
Code walkthrough
Let's work through the code snippet and break it down:
Step 1
First, we imported the required libraries and created default query and mutation types. The query and mutation only set the version of the GraphQL API for now. However, we will extend the query and mutation to include other schemas as we proceed. The #graphql comment at the start of the template string tells editors and tools that the string contains GraphQL schema code.
const users = require("./users")
const todos = require("./todos")
const { GraphQLScalarType } = require("graphql")
const { makeExecutableSchema } = require("@graphql-tools/schema")

const typeDefs = `#graphql
  scalar Time

  type Query {
    getVersion: String!
  }

  type Mutation {
    version: String!
  }
`
Step 2
Then we created a new scalar type for time and our first resolver for the query and mutation created above. In addition, we also generated a schema using the makeExecutableSchema function.
The generated schema includes all the other schemas we imported and will also include more when we create and import them.
const timeScalar = new GraphQLScalarType({
  name: "Time",
  description: "Time custom scalar type",
  serialize: (value) => value,
})

const resolvers = {
  Time: timeScalar,
  Query: {
    getVersion: () => `v1`,
  },
}

const schema = makeExecutableSchema({
  typeDefs: [typeDefs, users.typeDefs, todos.typeDefs],
  resolvers: [resolvers, users.resolvers, todos.resolvers],
})

module.exports = schema
The above code snippet shows that we imported different schemas into the makeExecutableSchema function. This approach helps us in structuring the application for complexity. Next, we are going to create the Todo and User schemas we imported.
Creating Todo schema
The Todo schema shows simple CRUD operations that users of the application can perform. Below is the schema that implements the Todo CRUD operation.
const createTodo = require("./mutations/create-todo")
const updateTodo = require("./mutations/update-todo")
const removeTodo = require("./mutations/delete-todo")
const todo = require("./queries/todo")
const todos = require("./queries/todos")

const typeDefs = `#graphql
  type Todo {
    id: ID!
    title: String
    description: String
    user: User
  }

  input CreateTodoInput {
    title: String!
    description: String
    isCompleted: Boolean
  }

  input UpdateTodoInput {
    title: String
    description: String
    isCompleted: Boolean
  }

  extend type Query {
    todo(id: ID): Todo!
    todos: [Todo!]
  }

  extend type Mutation {
    createTodo(input: CreateTodoInput!): Todo
    updateTodo(id: ID!, input: UpdateTodoInput!): Todo
    removeTodo(id: ID!): Todo
  }
`

// Provide resolver functions for your schema fields
const resolvers = {
  // Resolvers for Queries
  Query: {
    todo,
    todos,
  },

  // Resolvers for Mutations
  Mutation: {
    createTodo,
    updateTodo,
    removeTodo,
  },
}

module.exports = { typeDefs, resolvers }
Code walkthrough
Let's work through the code snippet and break it down:
Step 1
First, we created a schema for our Todo using GraphQL type, input, and extend. The extend keyword is used to inherit and add new queries and mutations to the existing root query and mutation we created above.
const typeDefs = `#graphql
  type Todo {
    id: ID!
    title: String
    description: String
    user: User
  }

  input CreateTodoInput {
    title: String!
    description: String
    isCompleted: Boolean
  }

  input UpdateTodoInput {
    title: String
    description: String
    isCompleted: Boolean
  }

  extend type Query {
    todo(id: ID): Todo!
    todos: [Todo!]
  }

  extend type Mutation {
    createTodo(input: CreateTodoInput!): Todo
    updateTodo(id: ID!, input: UpdateTodoInput!): Todo
    removeTodo(id: ID!): Todo
  }
`
Step 2
Next, we created a resolver, which is used to retrieve the correct data when a particular query or mutation is called.
const createTodo = require("./mutations/create-todo")

// Provide resolver functions for your schema fields
const resolvers = {
  // Resolvers for Queries
  Query: {
    todo,
    todos,
  },

  // Resolvers for Mutations
  Mutation: {
    createTodo,
    updateTodo,
    removeTodo,
  },
}
With the resolver function in place, we can create individual methods for the business logic and database manipulation as shown in the create-todo.js example.
Create a create-todo.js file in the ./mutations/ folder and add the business logic to create a new Todo in your database.
const models = require("../../../models")

module.exports = async (root, { input }, context) => {
  const todo = { id: String(models.todos.length + 1), ...input }
  models.todos.push(todo)
  return todo
}
The code snippet above is a simplified way of creating a new Todo: it stores the Todo in an in-memory array and returns it. In a real application, you would save it to a database with an ORM. You can learn more about Sequelize and how to set it up with Node.js.
You can follow the same step to create many schemas depending on your application or you can clone the complete project from GitHub.
Next, we are going to set up the server with Express.js and run the newly created Todo application with GraphQL and Node.js.
Setting up and running the server
Lastly, we will set up our server using the @apollo/server and @as-integrations/express5 packages we installed earlier.
The @as-integrations/express5 package provides the expressMiddleware function, which mounts Apollo Server on an Express.js route. Apollo Server expects a parsed JSON body, so the route also uses express.json(), and cors() lets browser clients on other origins call the API.
Using the examples we discussed above, let's configure the Express.js server to work with Apollo Server.
Create a server.js file in the root directory and paste in the following code:
const express = require("express")
const cors = require("cors")
const { ApolloServer } = require("@apollo/server")
const { expressMiddleware } = require("@as-integrations/express5")
const schema = require("./modules")

const app = express()

async function startServer() {
  const server = new ApolloServer({ schema })
  await server.start()

  app.use("/graphql", cors(), express.json(), expressMiddleware(server))

  app.listen({ port: 3000 }, () =>
    console.log(`Server ready at http://localhost:3000/graphql`)
  )
}

startServer()
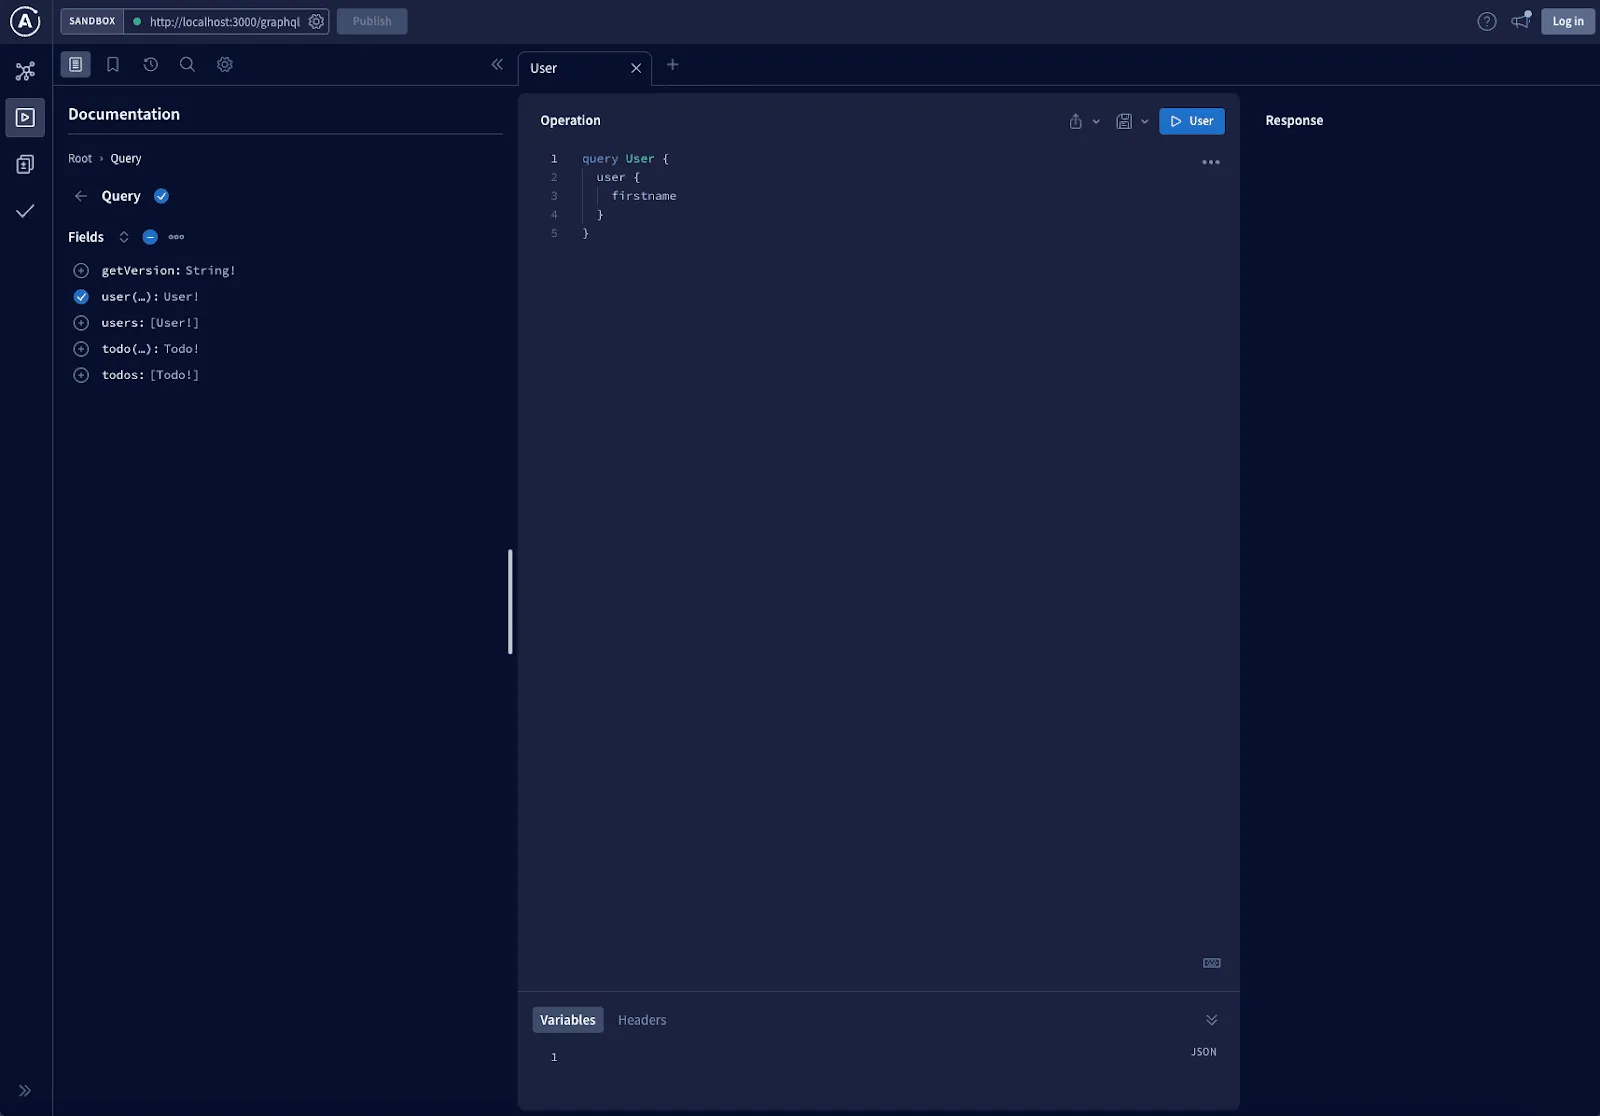
In the code above, you have successfully created your first CRUD GraphQL server for Todos and Users. You can start your development server with node server.js and open Apollo Sandbox at http://localhost:3000/graphql. If everything is successful, you should be presented with the screen below:
Summary
GraphQL is modern technology supported by Facebook that simplifies the tedious work involved in creating large-scale APIs with RESTful architectural patterns.
This guide has elucidated GraphQL and demonstrated how to develop your first GraphQL API with Express.js.